Learn how to use Firebase & Clerk.dev (CRUD)
Thu Jan 06 2022
Here we are, the new year is upon us, and if you are like me, you have set some New Year’s resolutions for yourself. Possibly learning a new language, skill or improving on the foundation that you have. What a better way to kick off the year then we with a crash course!
This blog post is going to show you how you can integrate both Clerk and Firebase together to create a recipe application. The post is also in video form so if you prefer that click the link and enjoy the show.
A few things to note about this post:
- The UI is pre built by me so there will be no UI coding in the video.
- No error handling is enforced as it’s about the integration then proper standards.
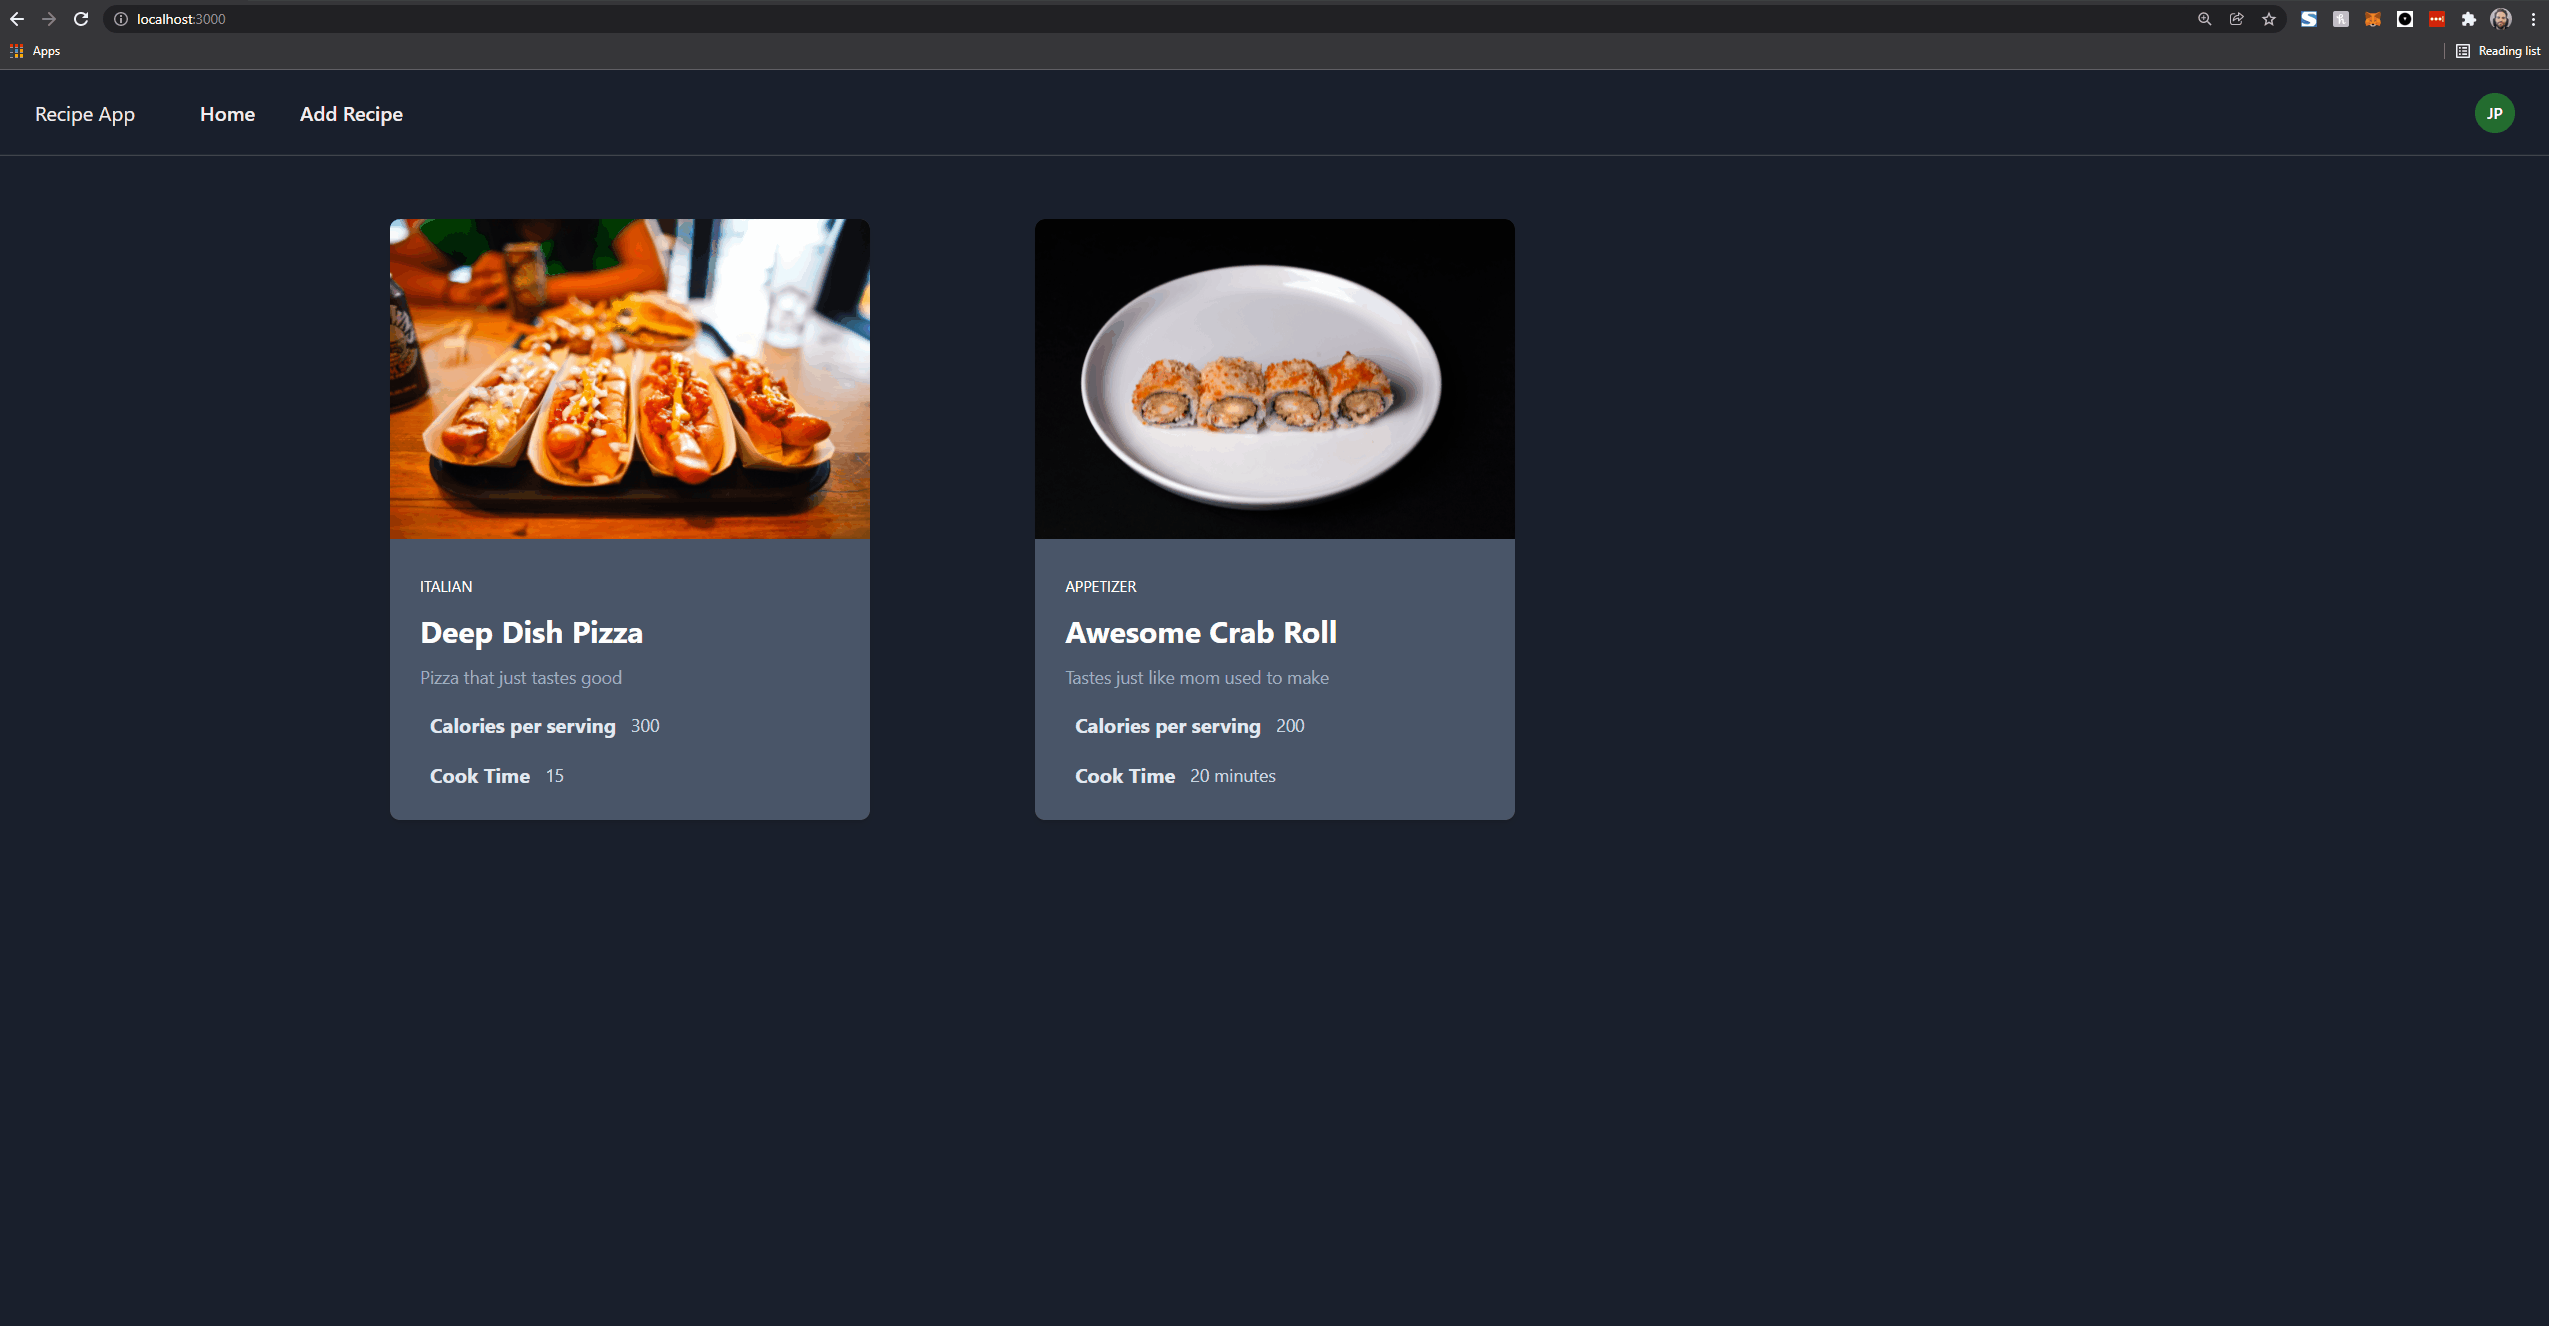
Here is what it looks like:
Firebase Setup
Creating our Project.
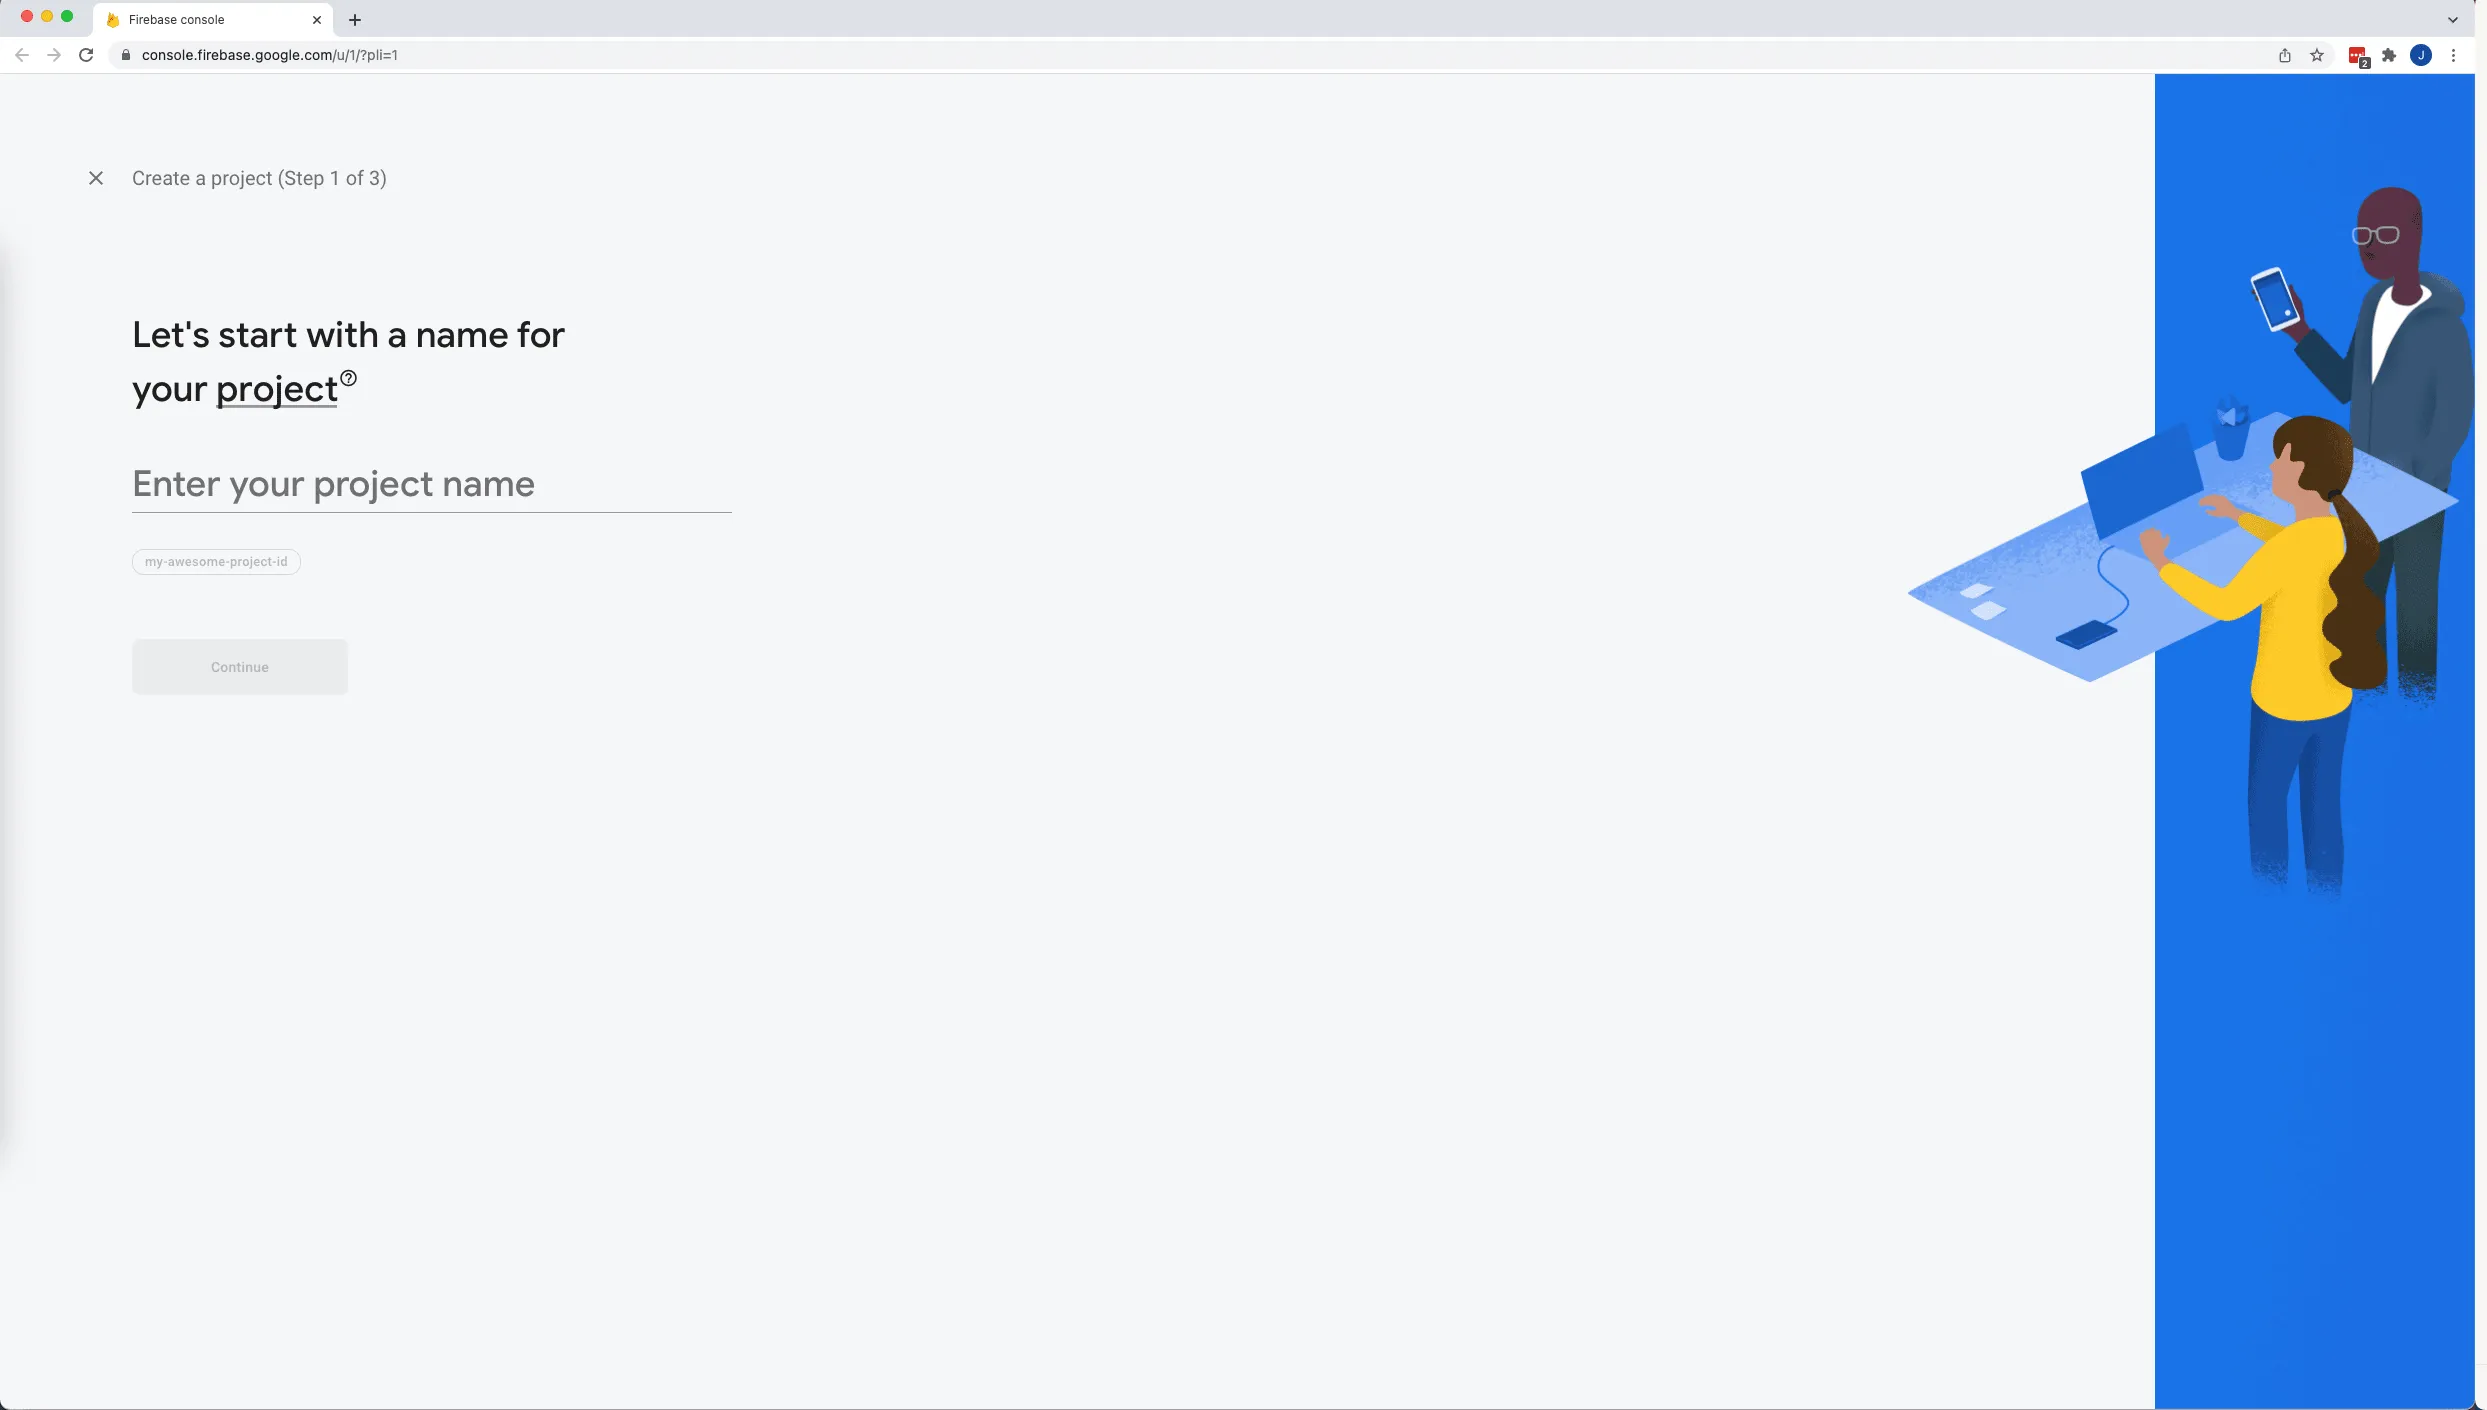
To begin with you will need to signup for a firebase account, once you have signed up, you will need to create a new project. From the Dashboard select Add project. Then Give your project a name. Lets call it Recipe-app
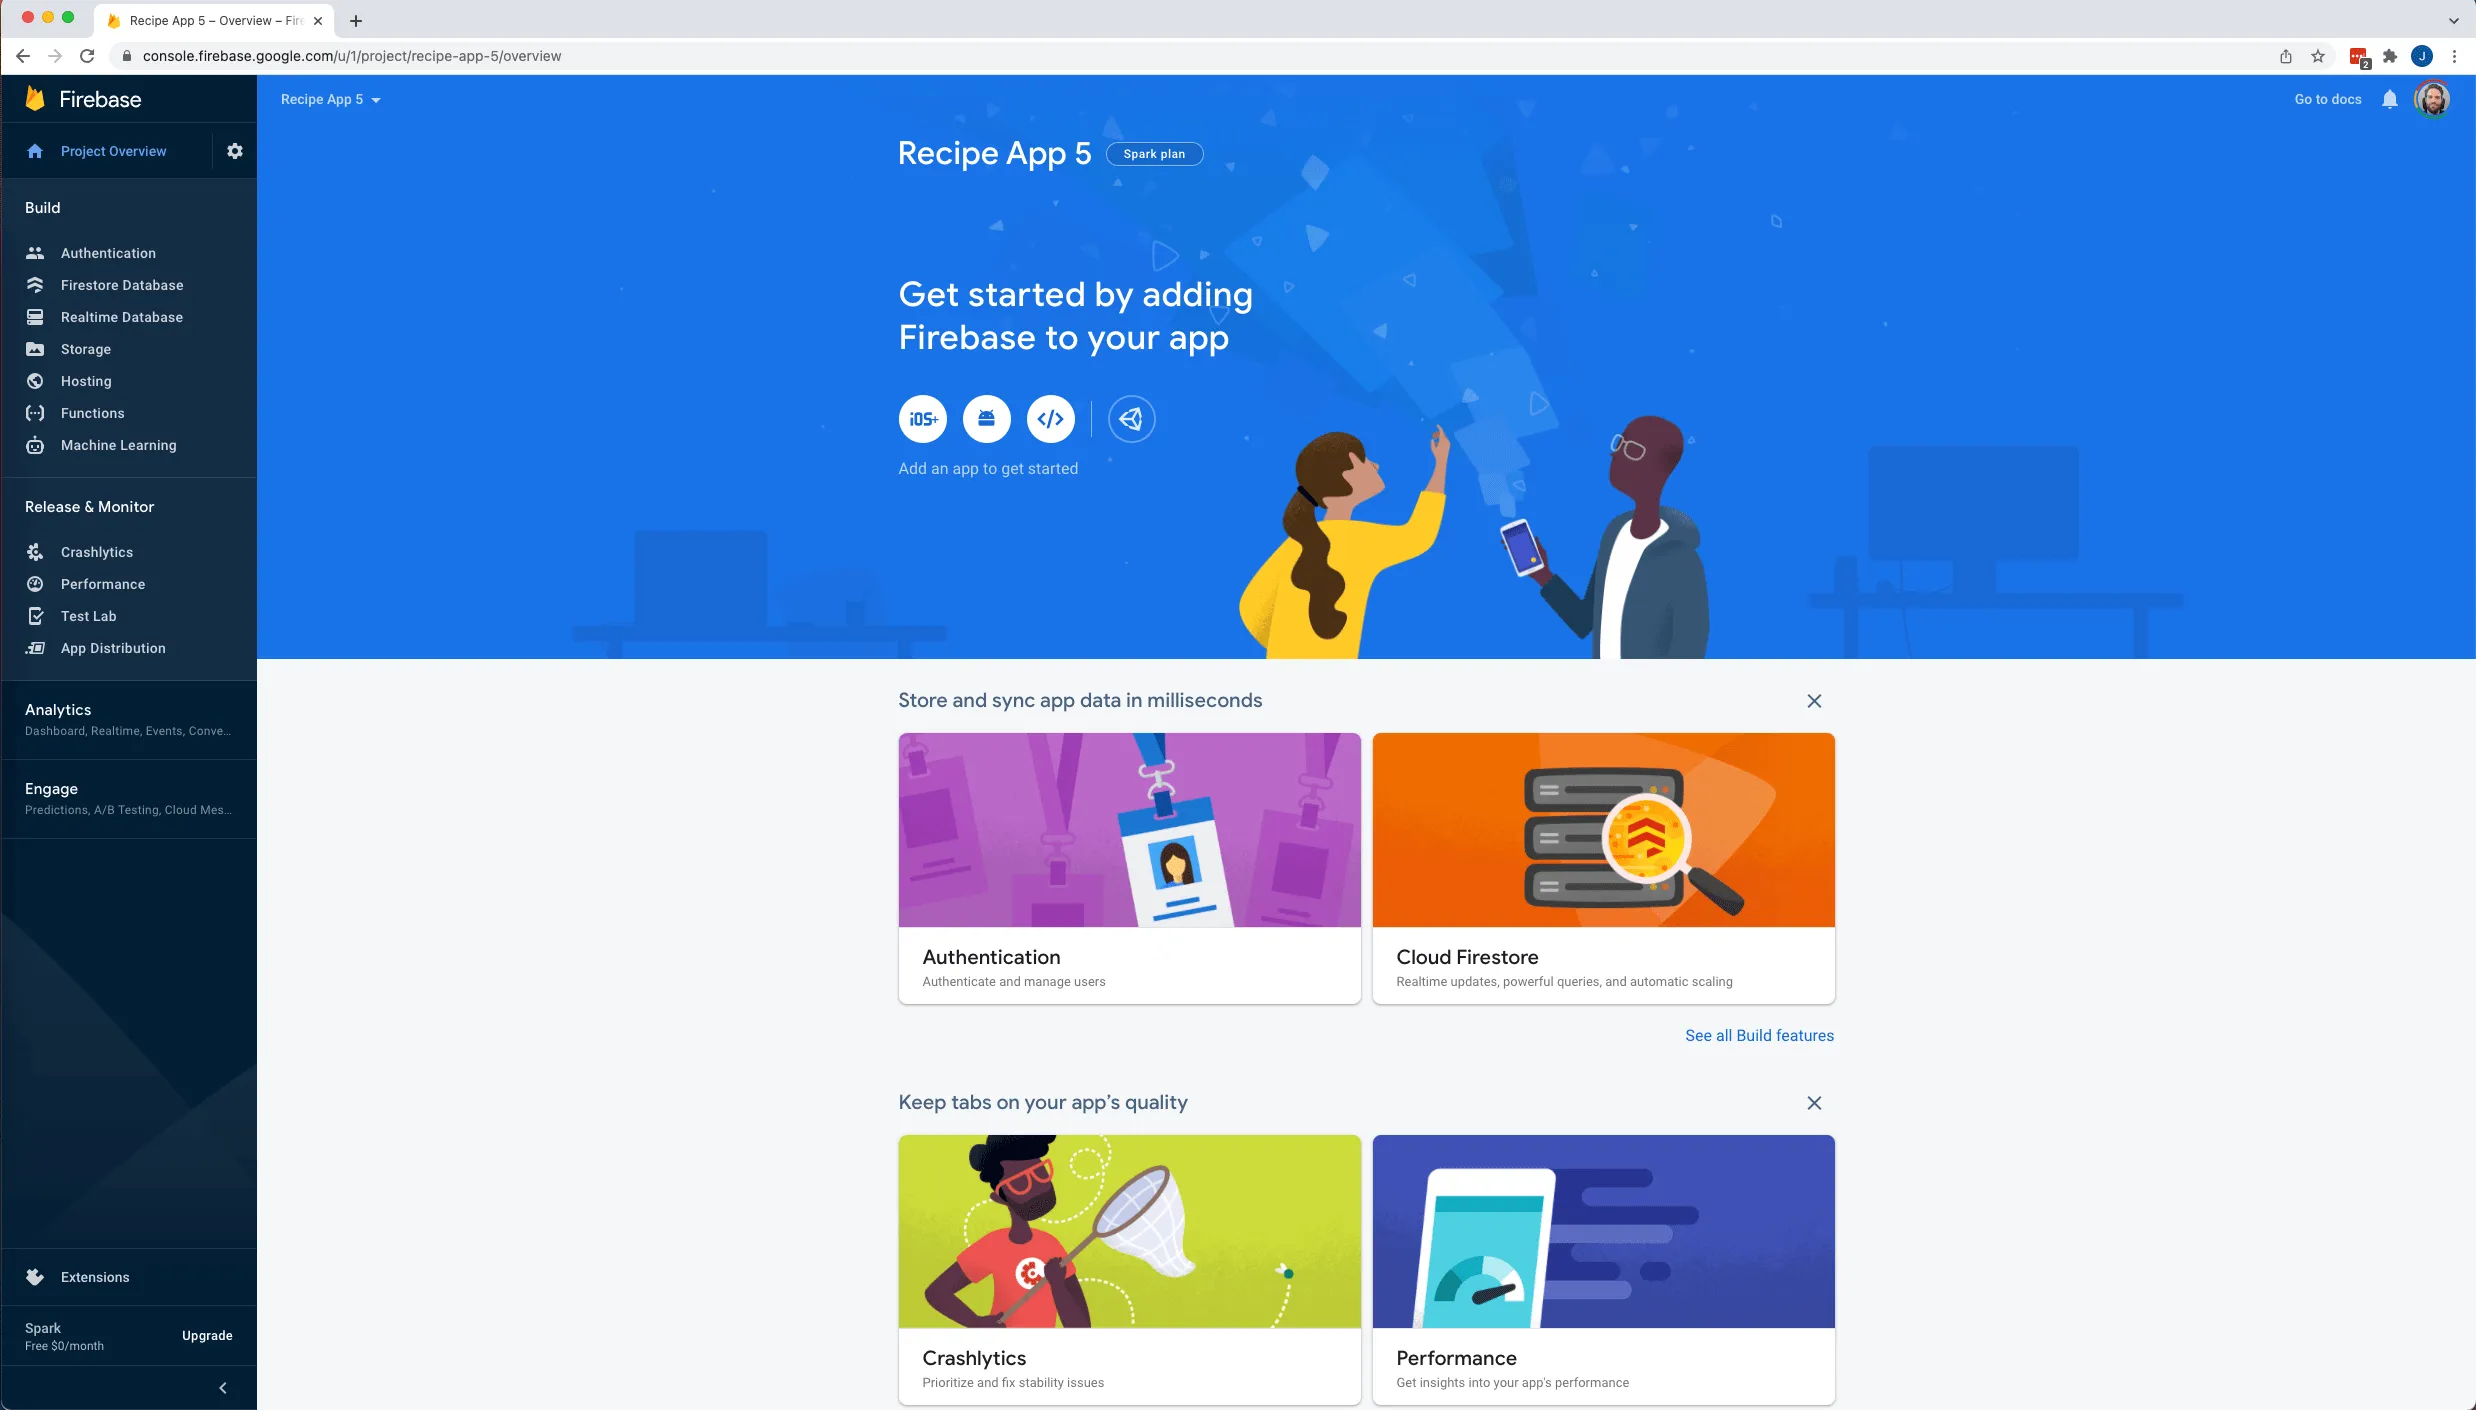
Then select whether you want your project to have Analytics from Google and then hit Create project. Once your project is setup you will see the following screen:
Adding Authentication
We need to add authentication to our project so that Clerk and Firebase can talk to each other, this is a two step process:
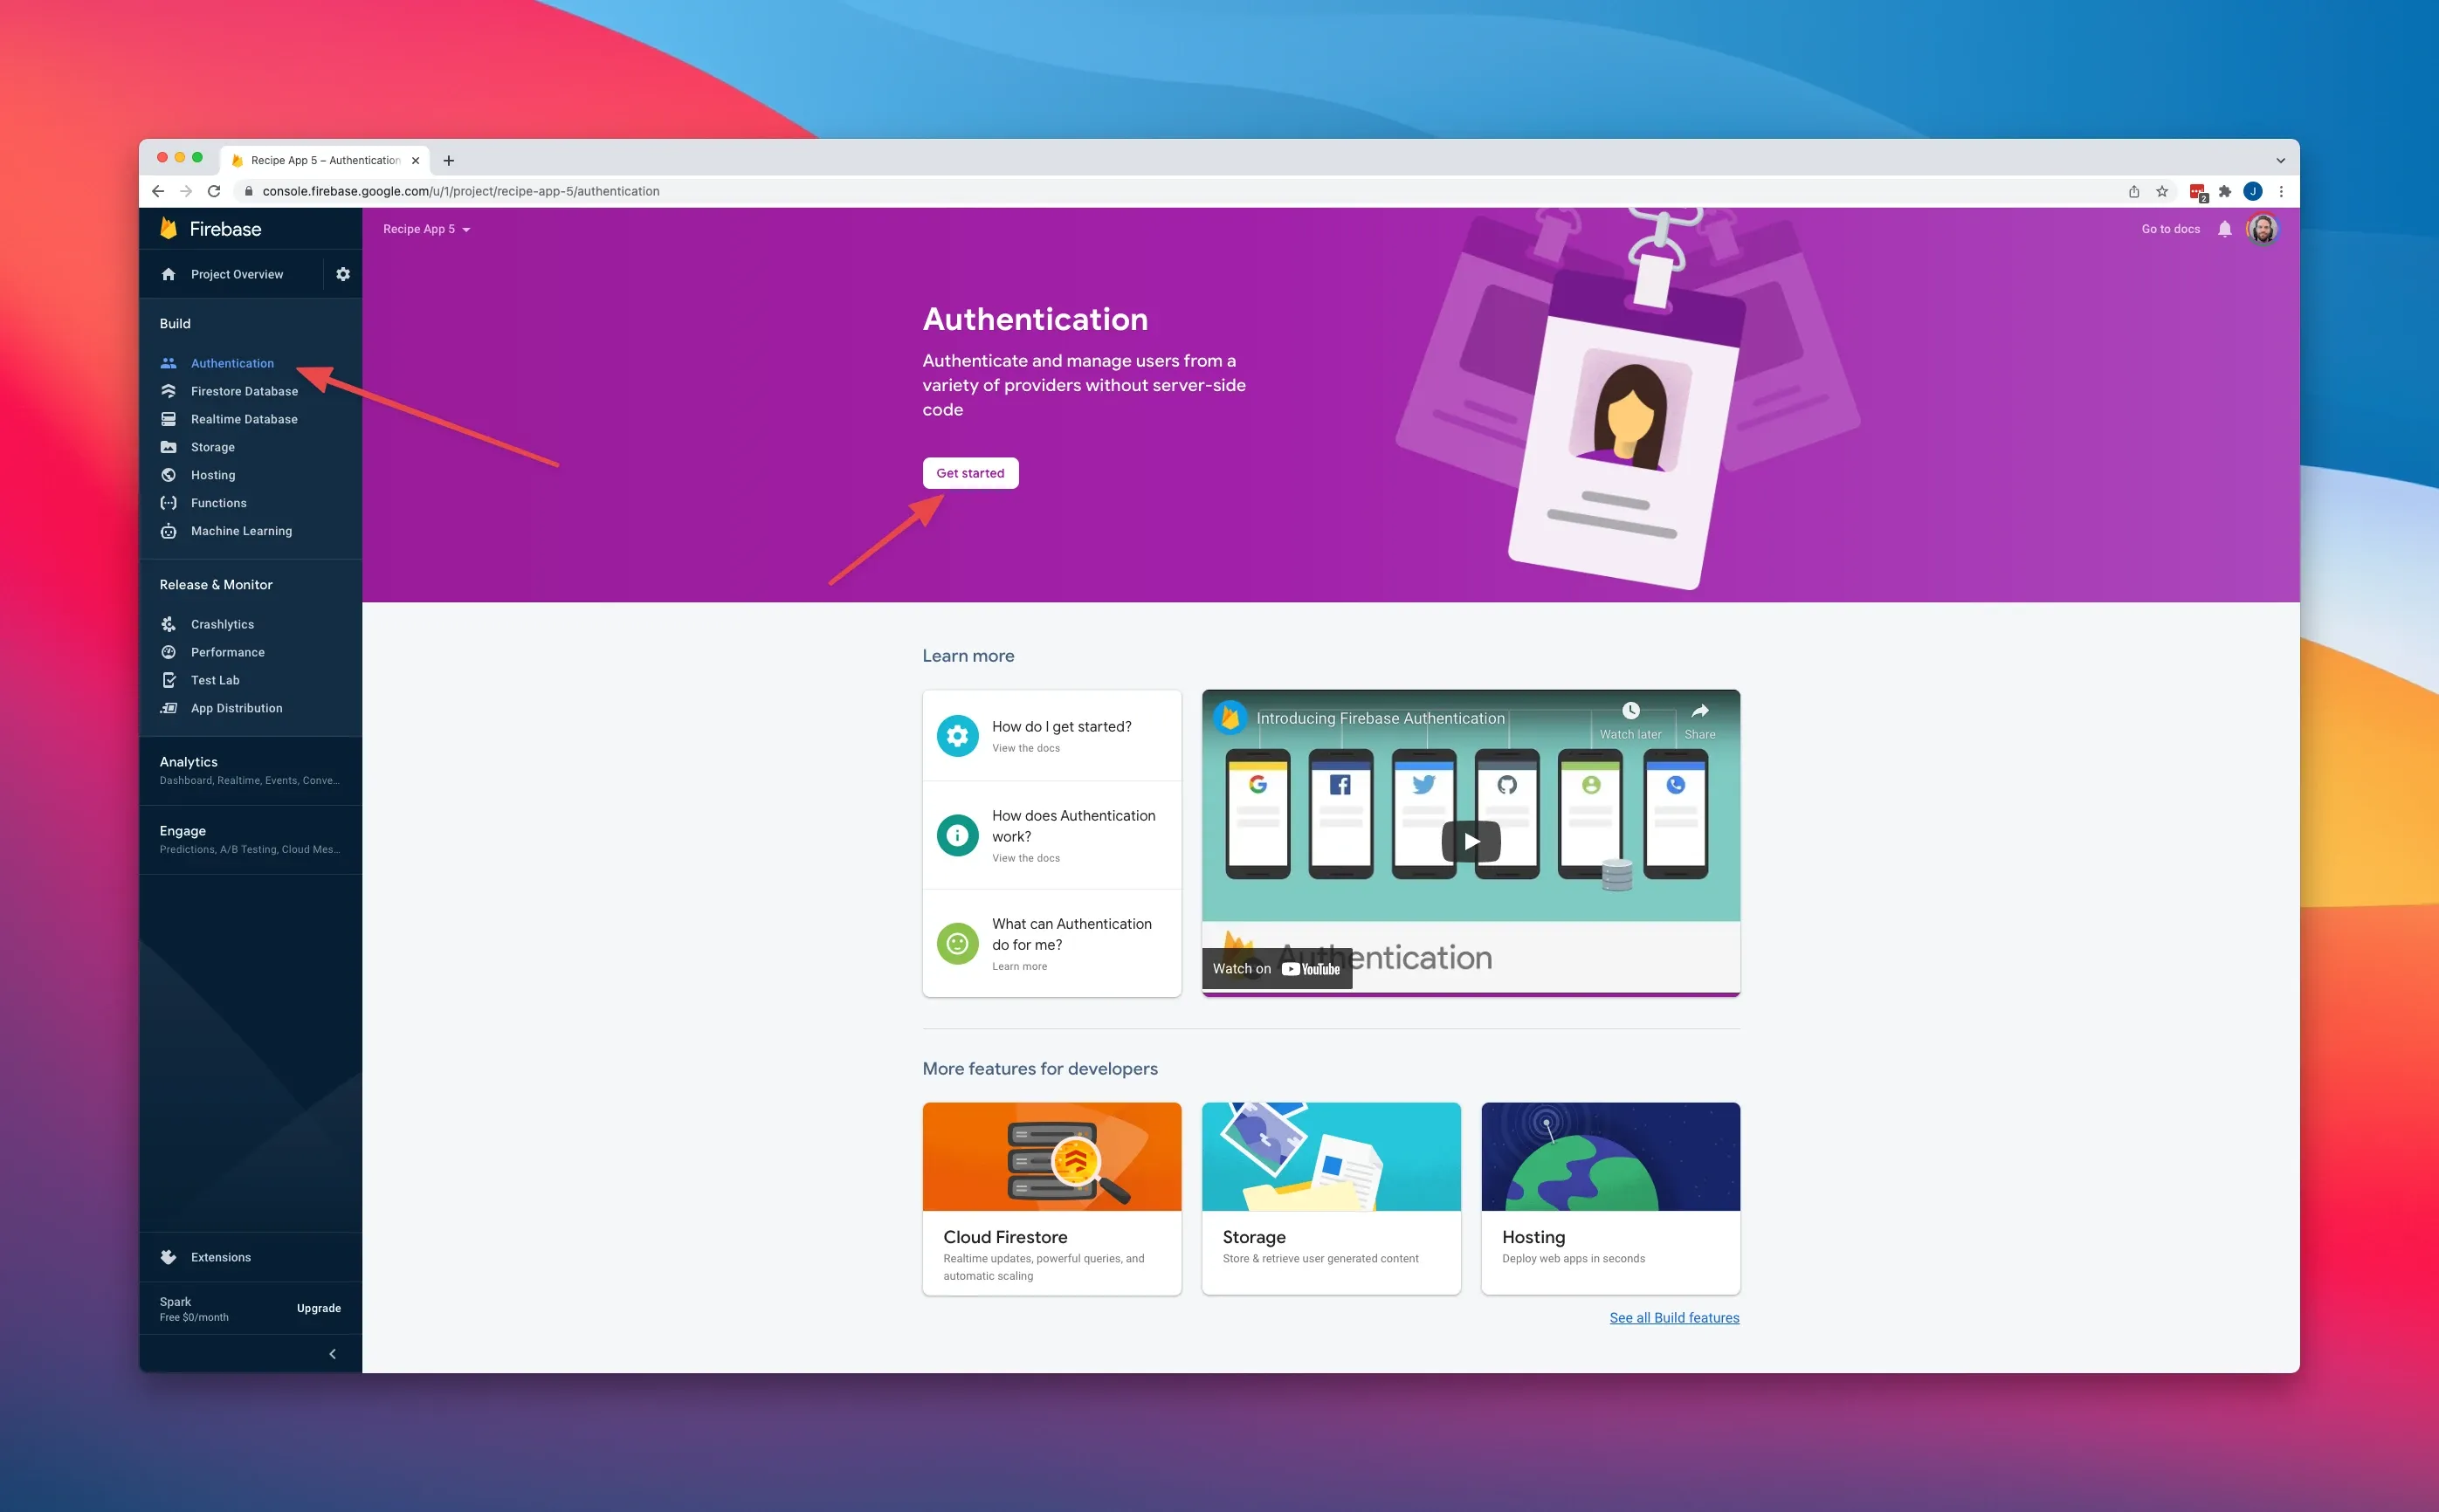
- Select Authentication from the left hand menu
- Click the Getting Started button that shows at the top.
After that it will be enabled so that Clerk and Firebase can talk to each other.
Adding Firestore Database
Now we need to add Firestore as our Database this is where we are going to store all our delicious recipes. To add firestore to our project:
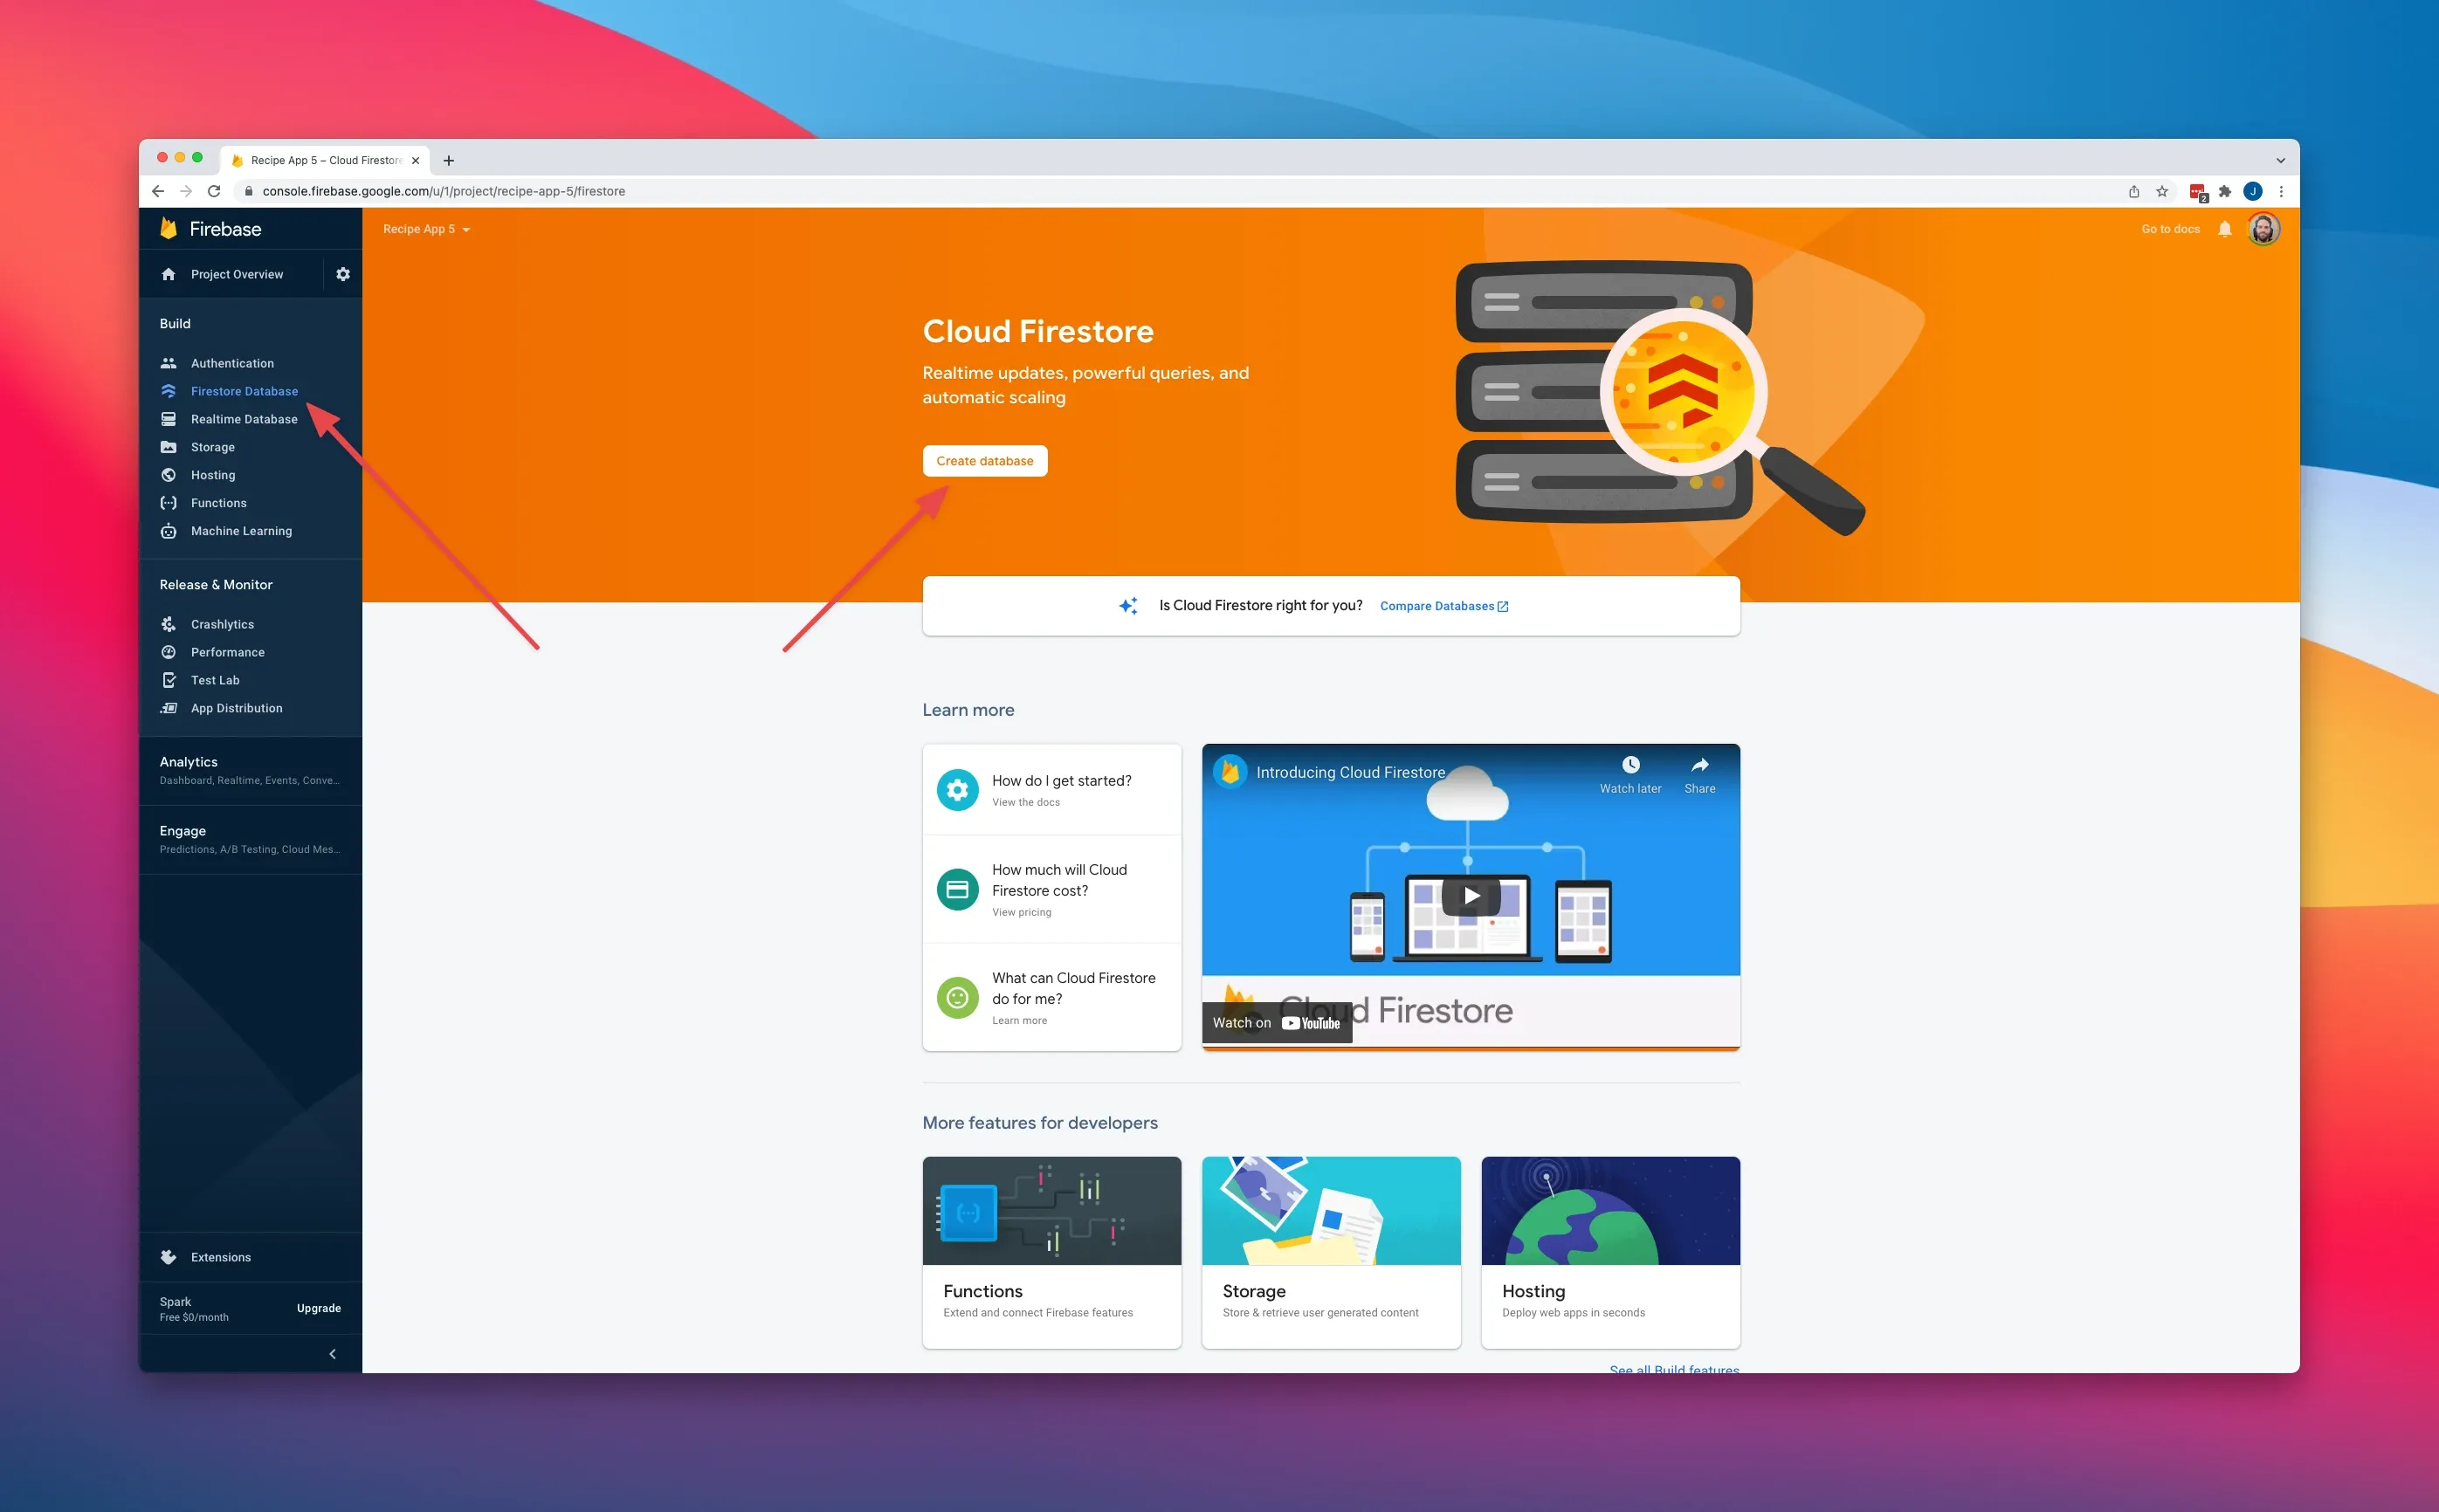
- Select Firestore Database from the left hand menu
- Click the Create database button
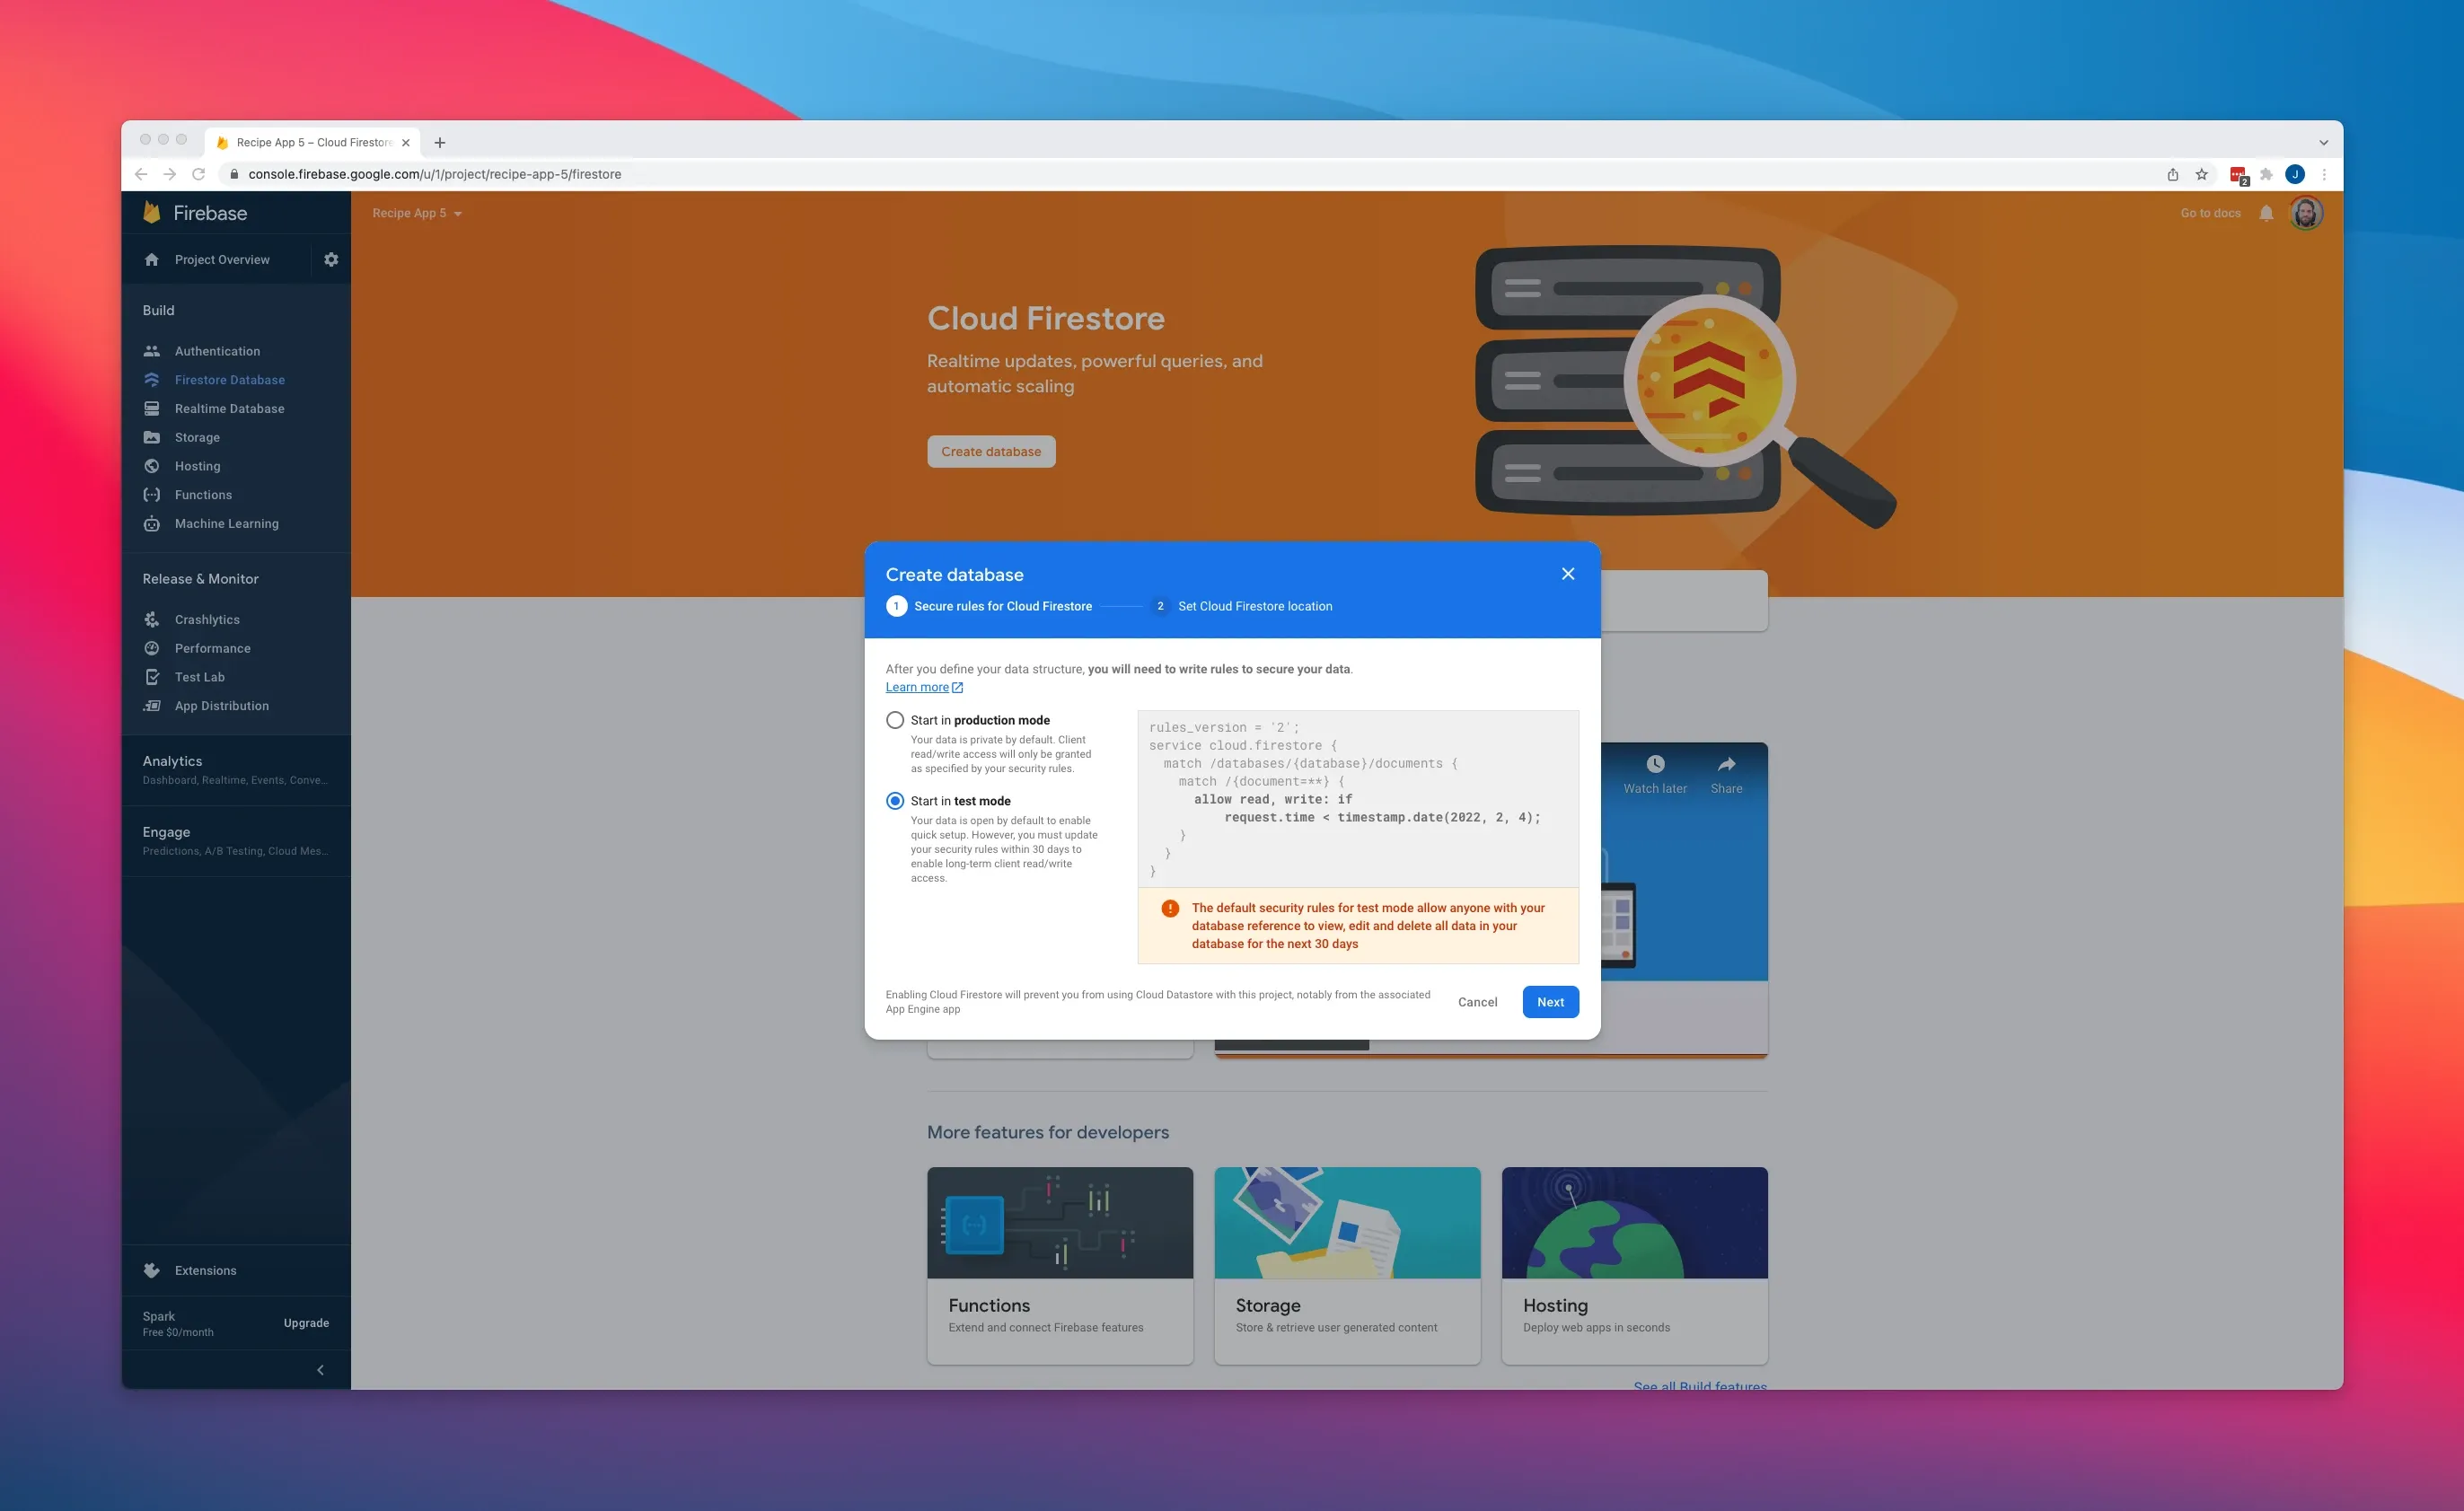
- Select Start in test mode for now, we will update our rules in just a second to allow only authenticated users to edit our database.
- Select the appropriate Firestore location for you. Note this cannot be changed later so make sure you double check. The Default is fine in most cases. Then click Enable.
Now that our Database has been provisioned we want to do insert a single Item into the database and set our rules to protect us. Let us start by creating a collection and insert an item into the database.
Insert Data
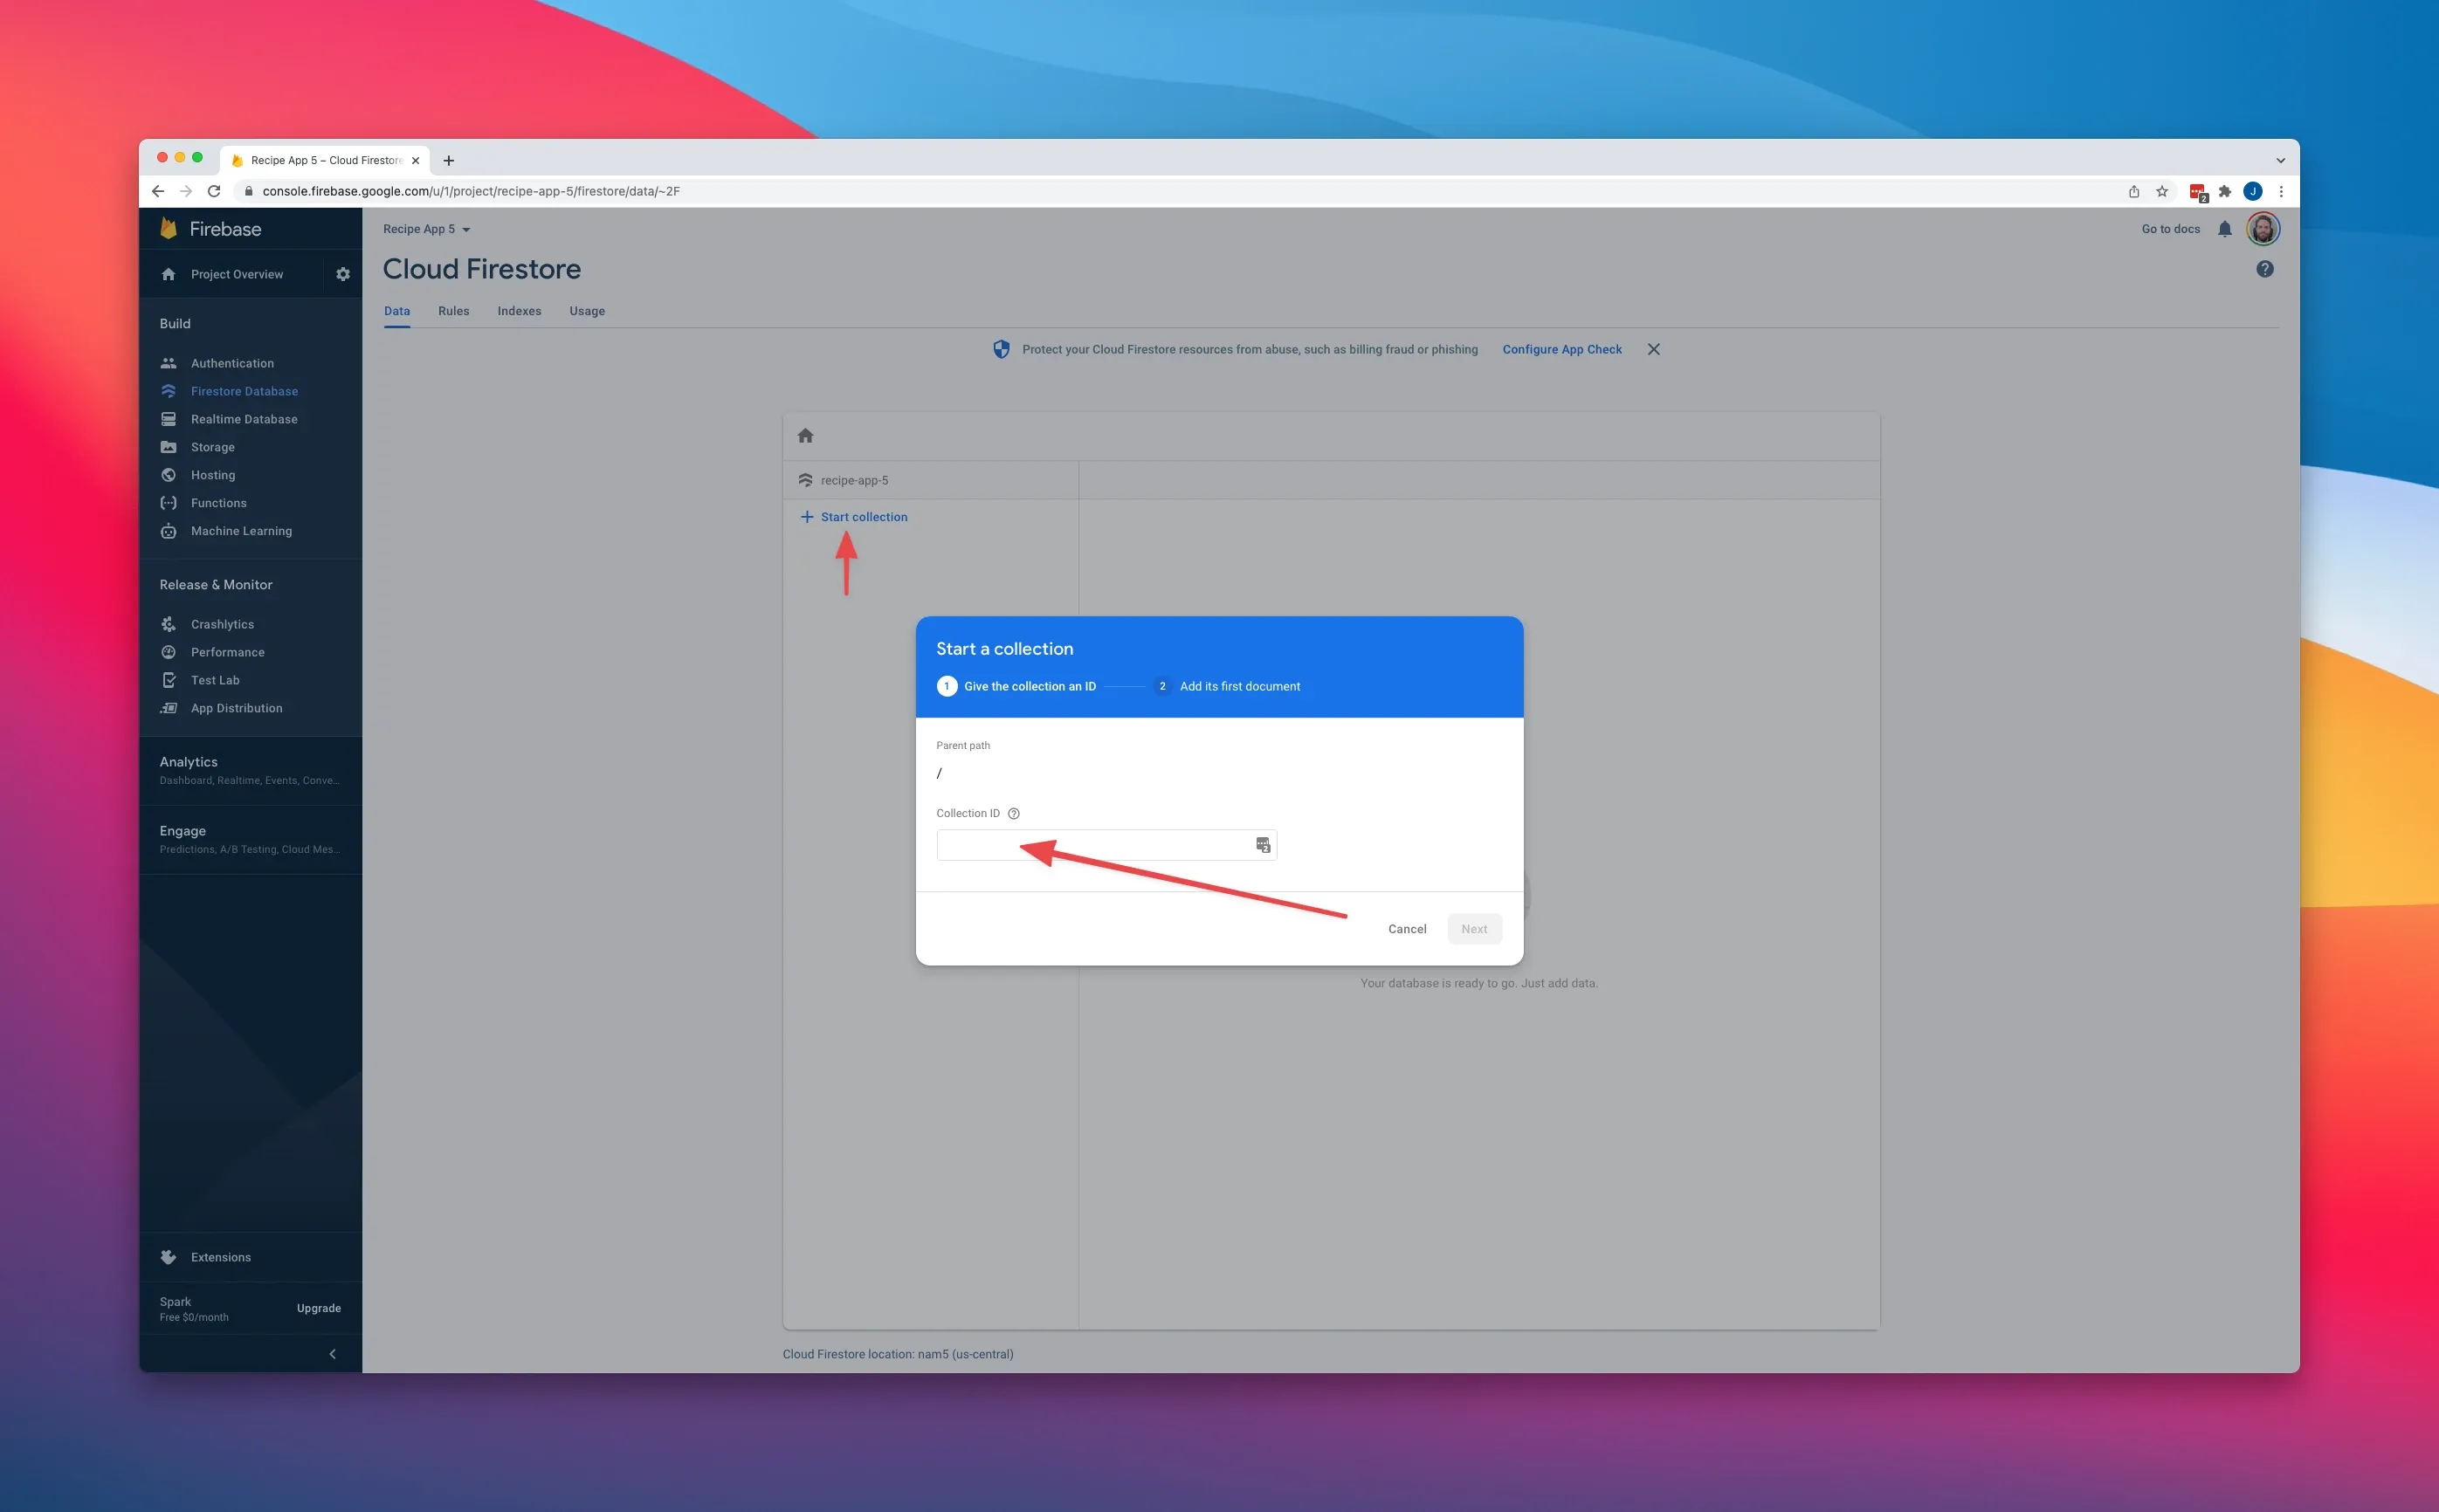
- From the Cloud Firestore Data tab (The one you landed on after provising.
- Select Start Collection, and give it the id of “recipes”
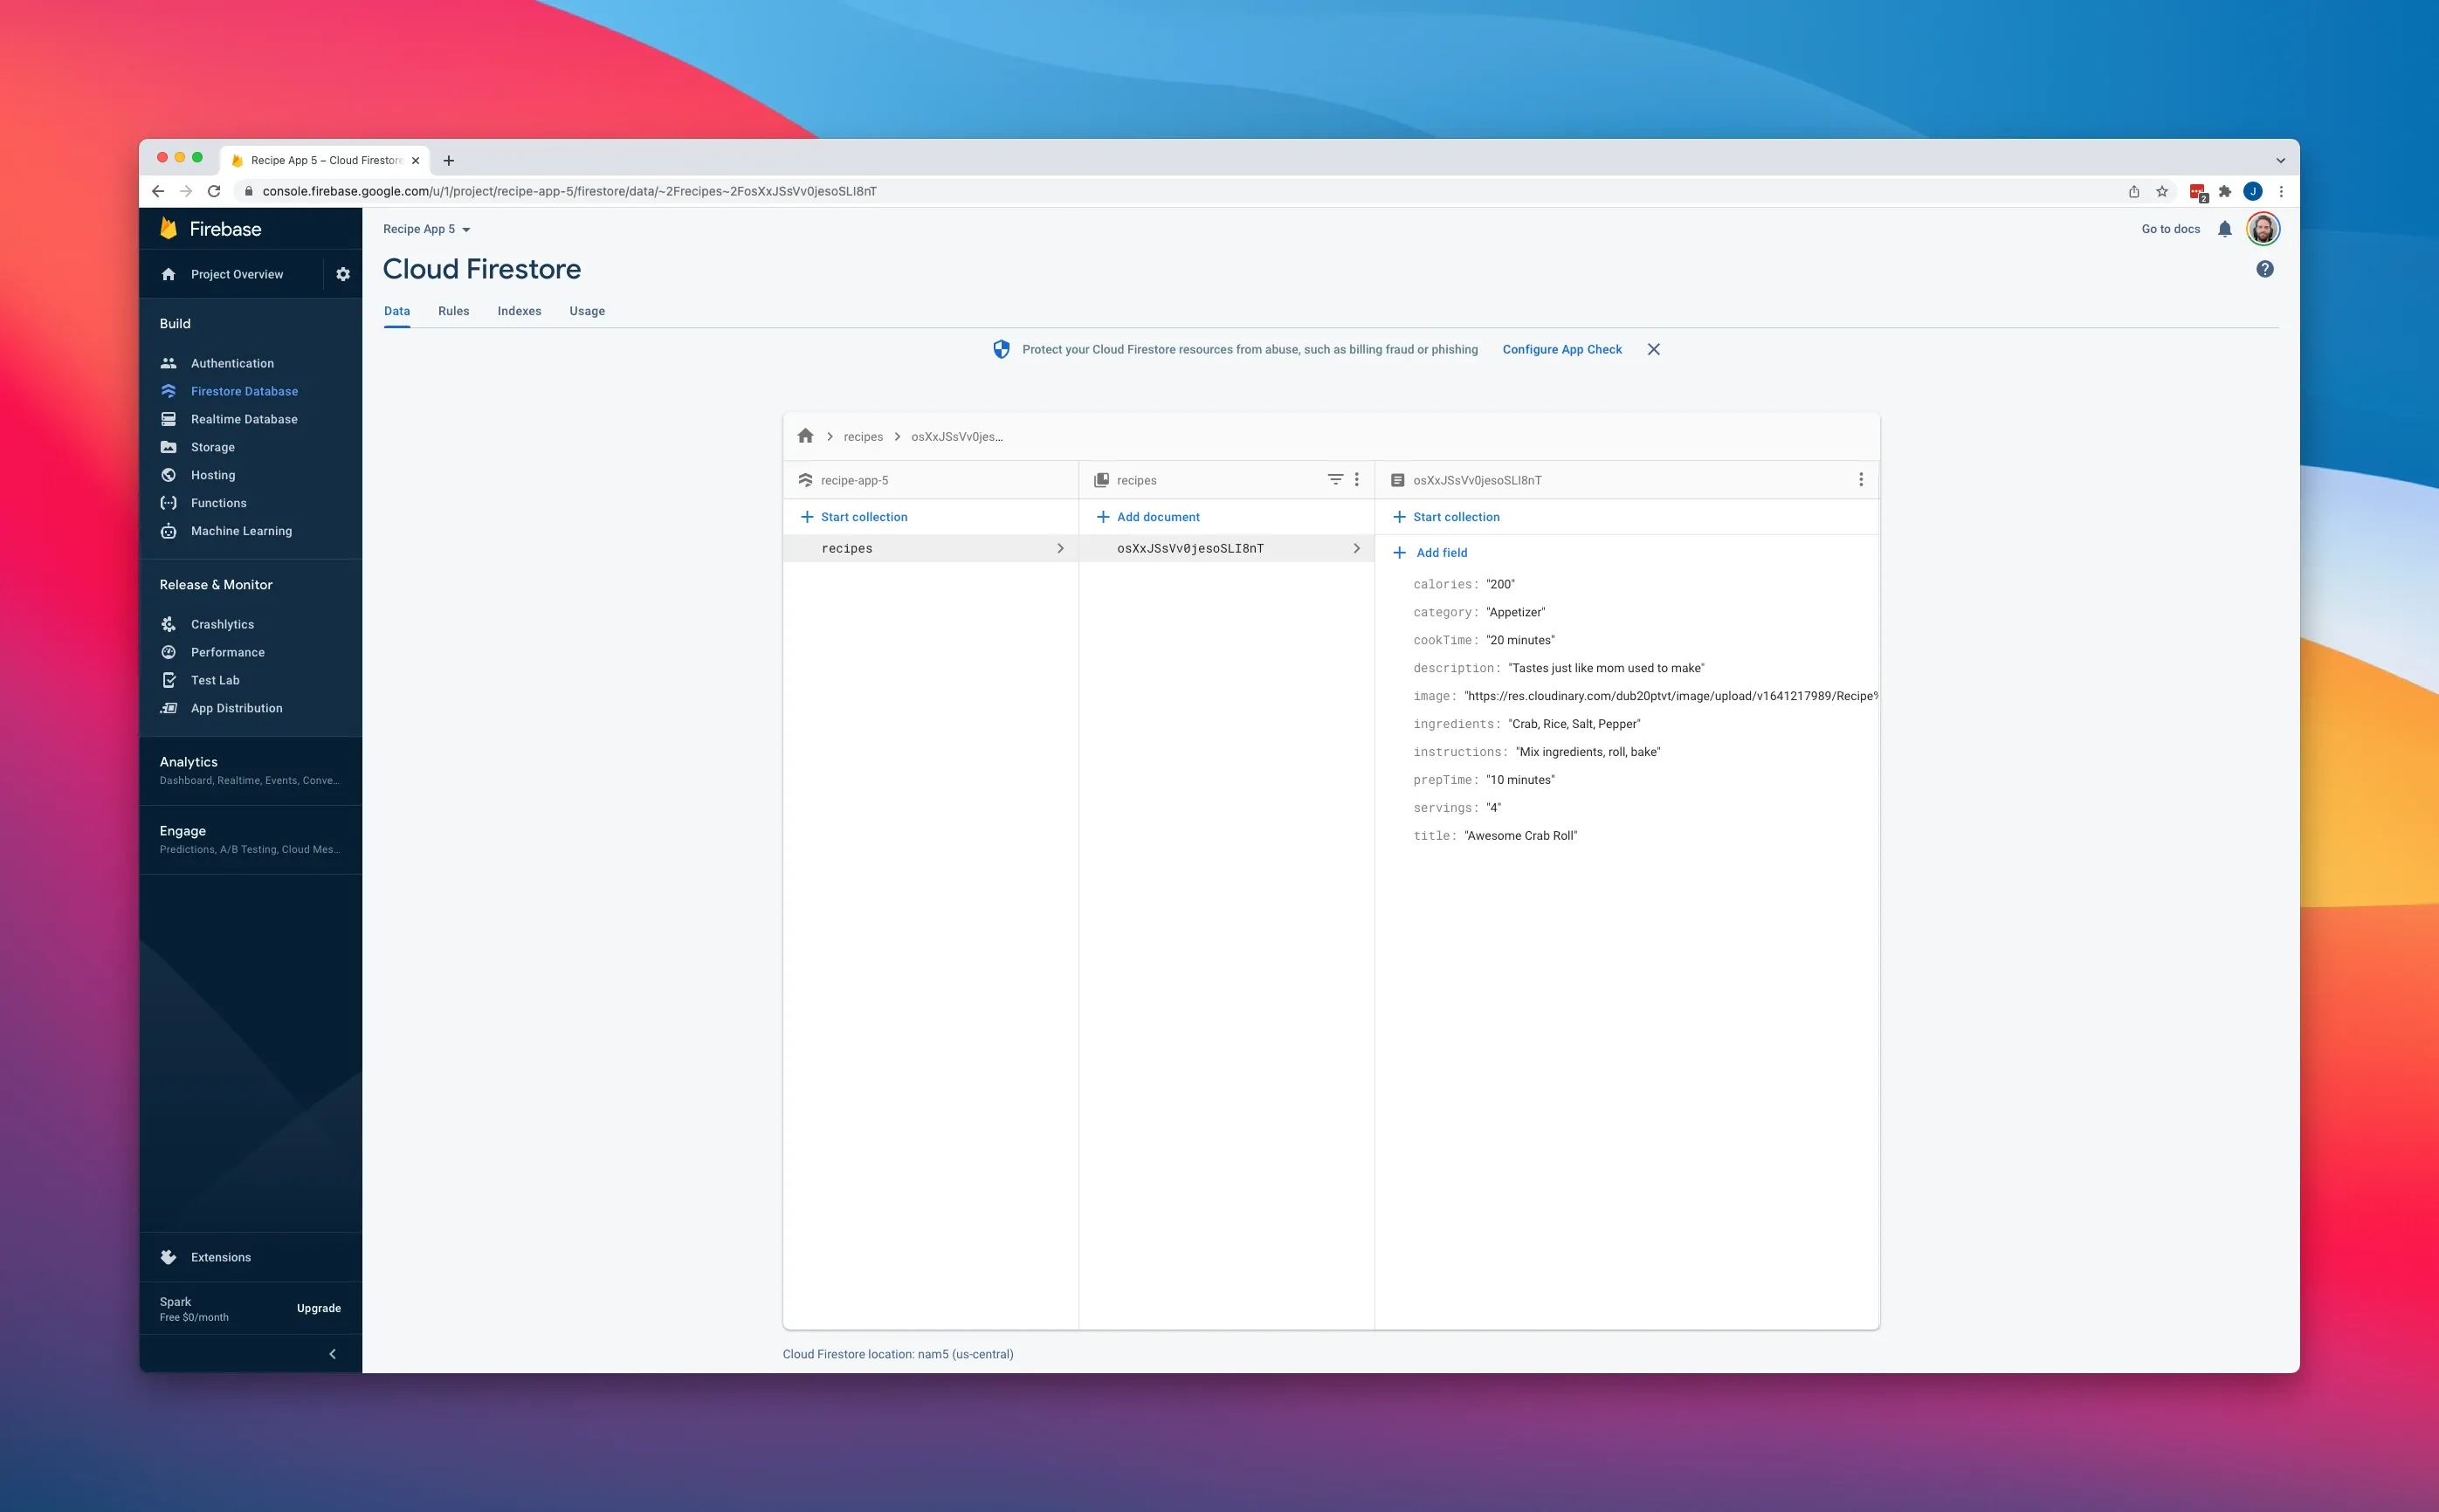
- On the next screen you will insert all of the data, below is the data in an Object, you will want to select auto generate for the Document ID. Each field is a string.
{
    "title": "Awesome Crab Roll",
    "description": "Tastes just like mom used to make",
    "ingredients": "Crab, Rice, Salt, Pepper",
    "instructions": "Mix ingredients, roll, bake",
    "image": "https://res.cloudinary.com/dub20ptvt/image/upload/v1641217989/Recipe%20App/yzt6ekukk0tvt4ipj9rg.jpg",
    "category": "Appetizer",
    "prepTime": "10 minutes",
    "cookTime": "20 minutes",
    "servings": "4",
    "calories": "200"
}
Rules
If you navigate to the Rules tab you will the following rule:
rules_version = '2';
service cloud.firestore {
  match /databases/{database}/documents {
    match /{document=**} {
      allow read, write: if
          request.time < timestamp.date(2022, 2, 4);
    }
  }
}
What is happening here is that we have a single if rule that states as long as the data is before this date allow reads and writes. We want to change that to be read all the time and only write if they have an auth token. Firstly remove all the content from inside the second match statement. It should now look like this:
rules_version = '2';
service cloud.firestore {
  match /databases/{database}/documents {
    match /{document=**} {
    }
  }
}
We can now write our rules, for read we can just return true and for write we can check if the auth is not null and allow them to insert them.
rules_version = '2';
service cloud.firestore {
  match /databases/{database}/documents {
    match /{document=**} {
      allow read: if true;
      allow write: if request.auth != null;
    }
  }
}
Creating our Service Account for Clerk.
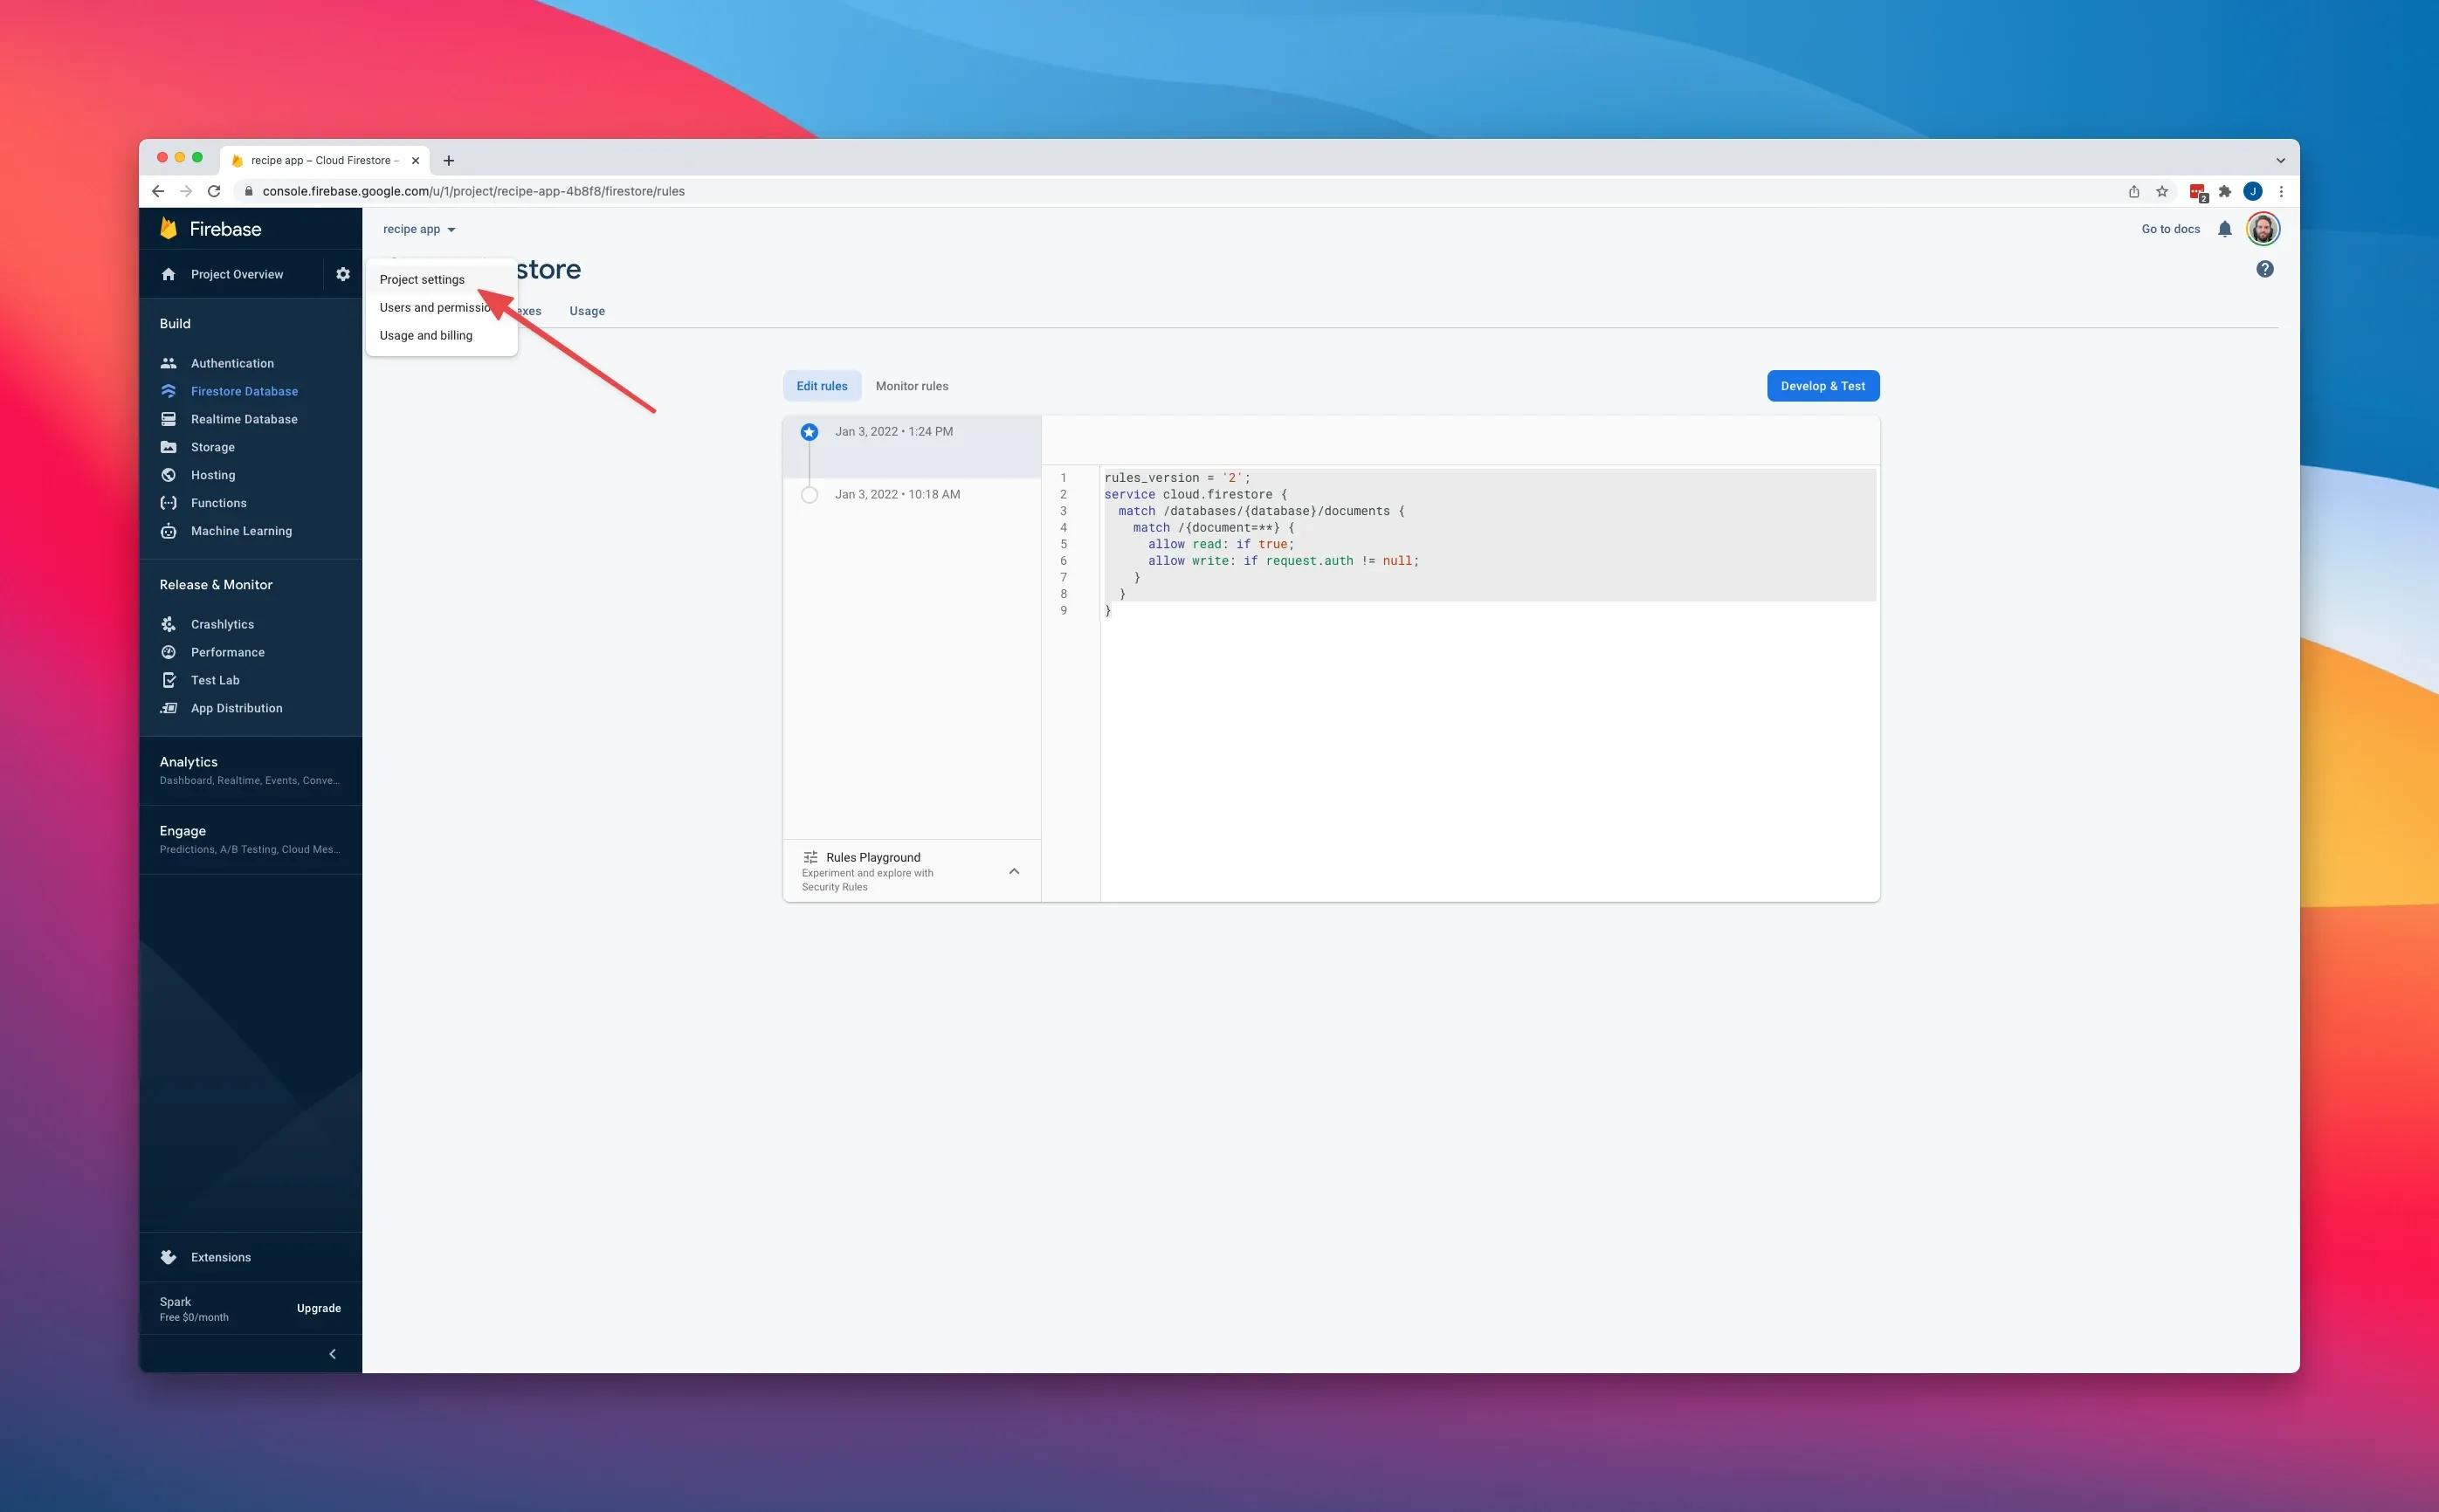
Now we have setup our database we need a Service Account for Clerk to use, from the side bar select the cog wheel and then project settings.
This will bring you to a screen with many different settings, we want to select Service Accounts and then click the button generate new private key and in the pop up select Generate key.
This will create a JSON that contains secrets we can use for Clerk, this file has top secret info and shouldn’t be shared anywhere.
Clerk Setup
Clerk is one of the best Next.js authentication products out there, it takes away a lot of the pain points of user management such as:
- User Profiles
- JWT management
- Sign Up, Sign In, Route Protection
- Pre built components and hosted sign up.
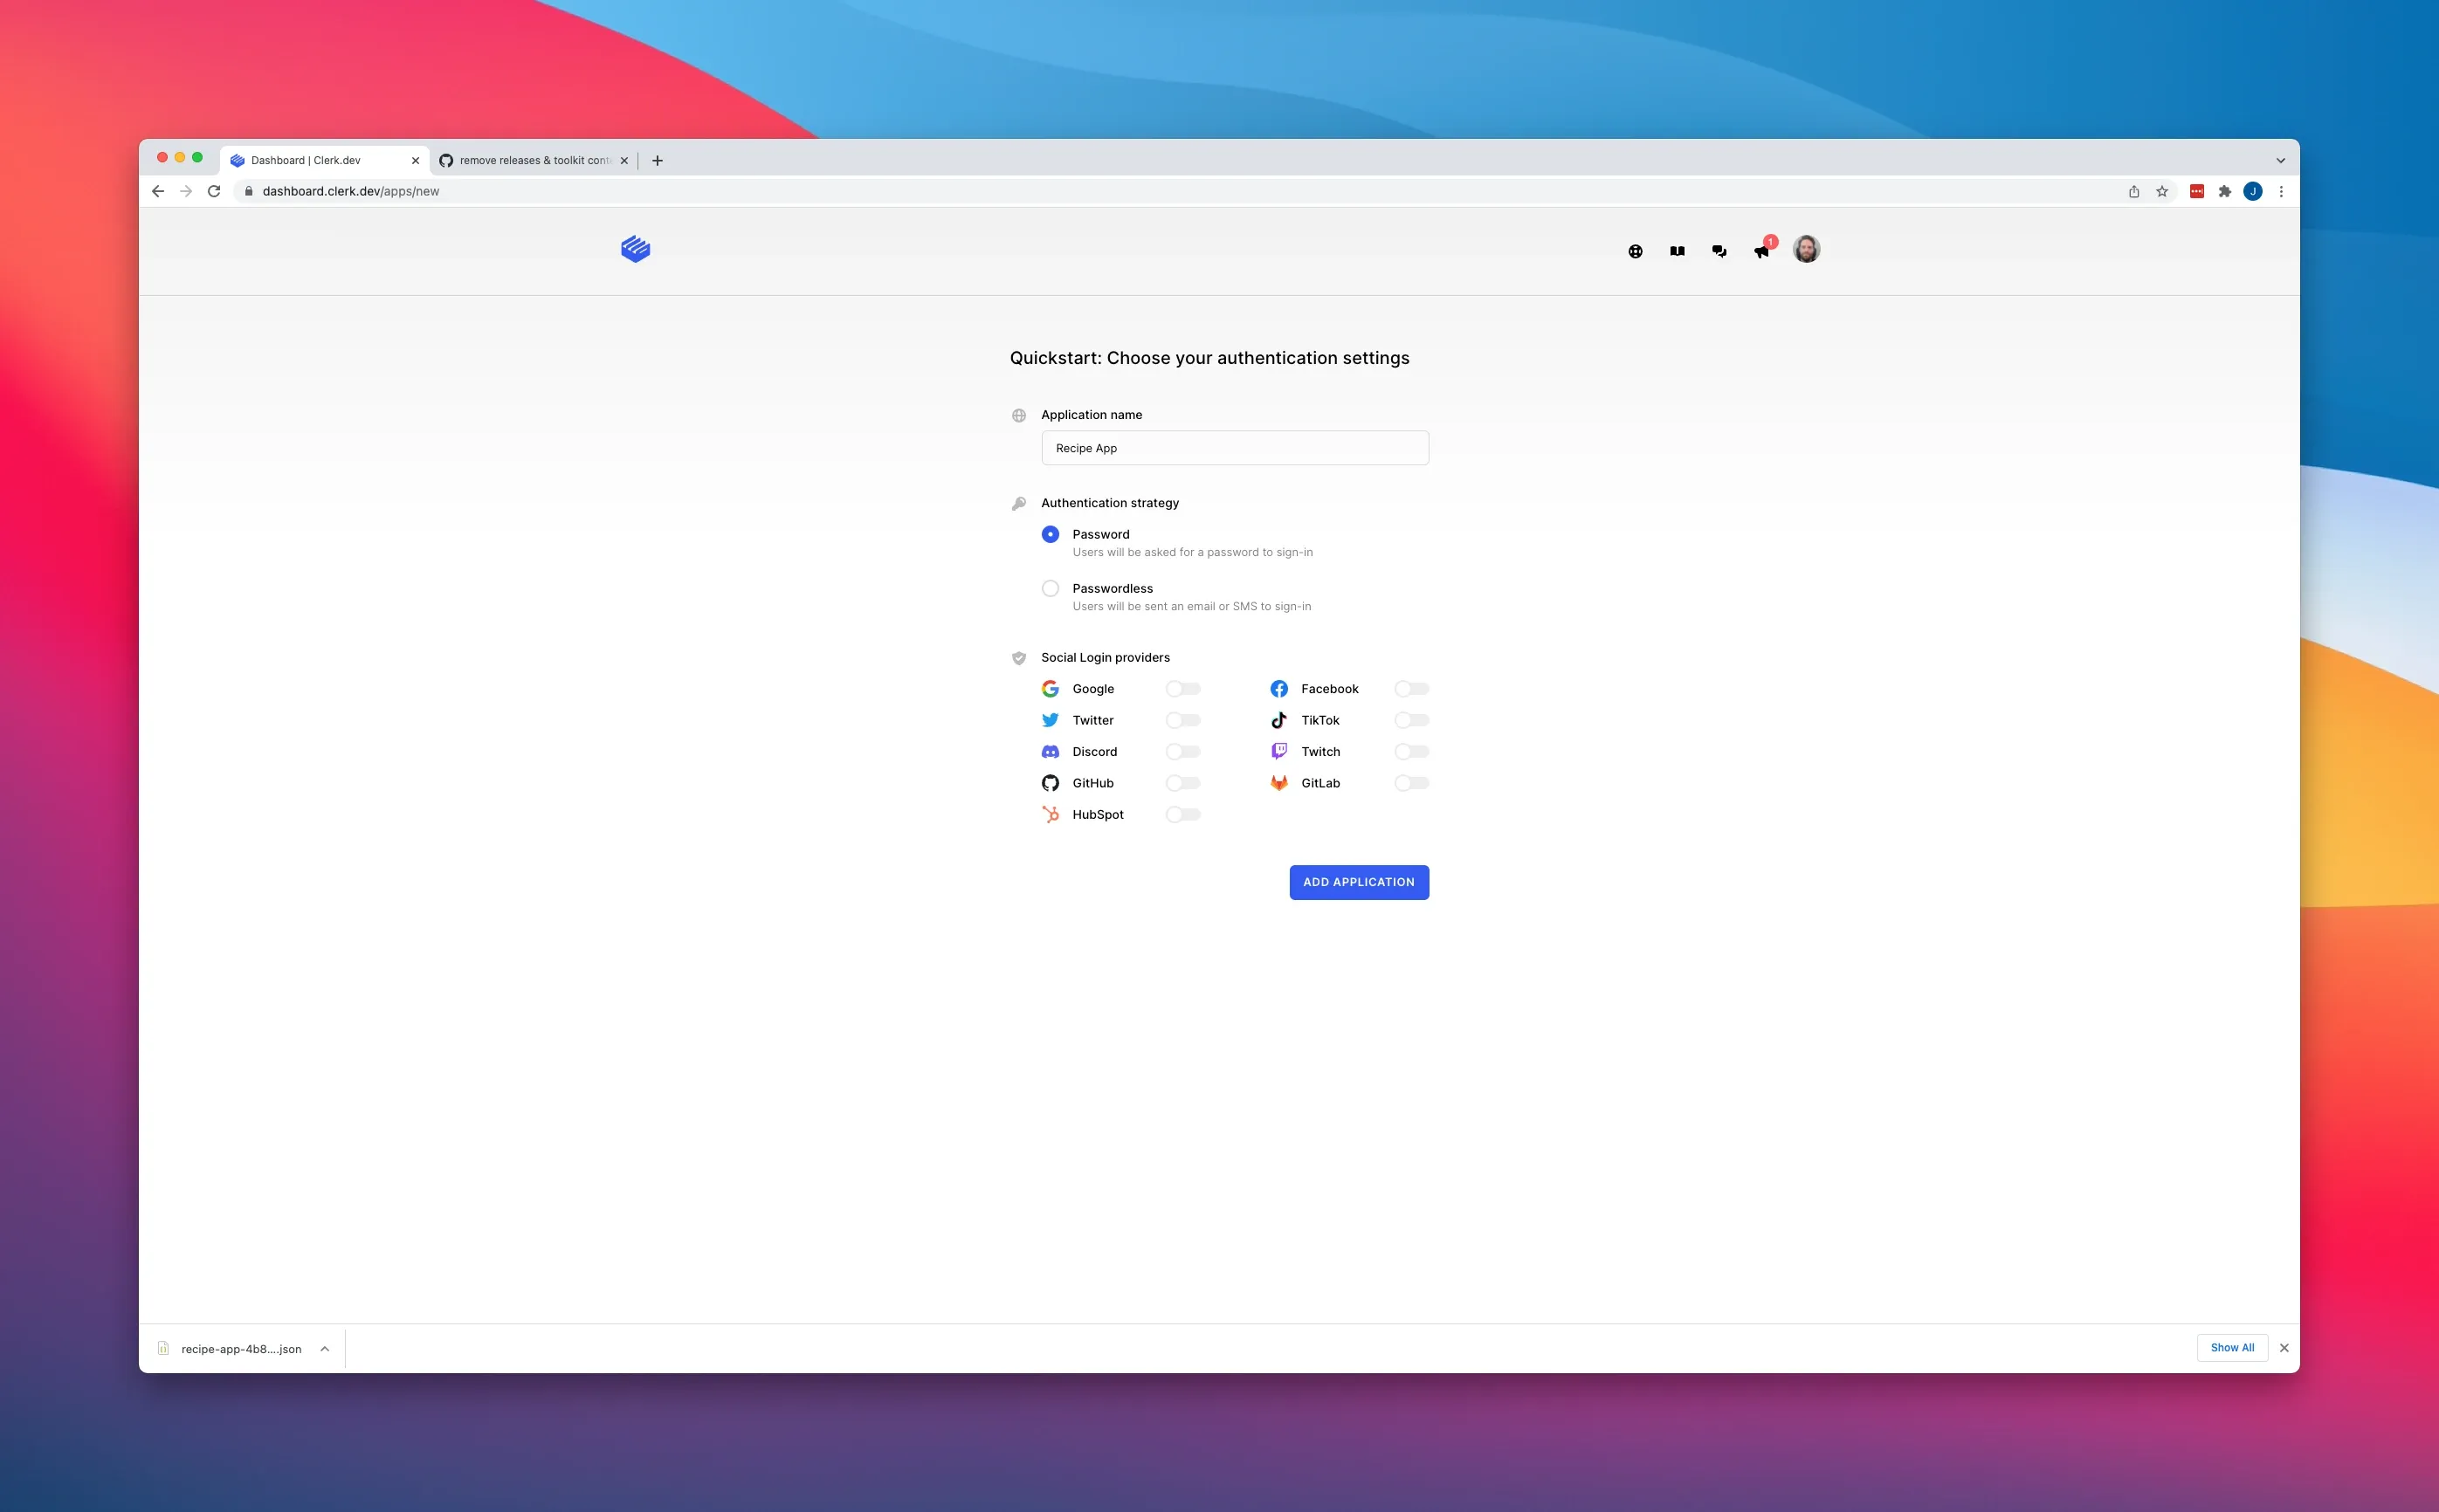
Once you have signed up for account you will arrive at the Applications page, click add application. Give your application a new, I chose “Recipe App” and remove the social logins. Click Add Application Button.
Integration Setup.
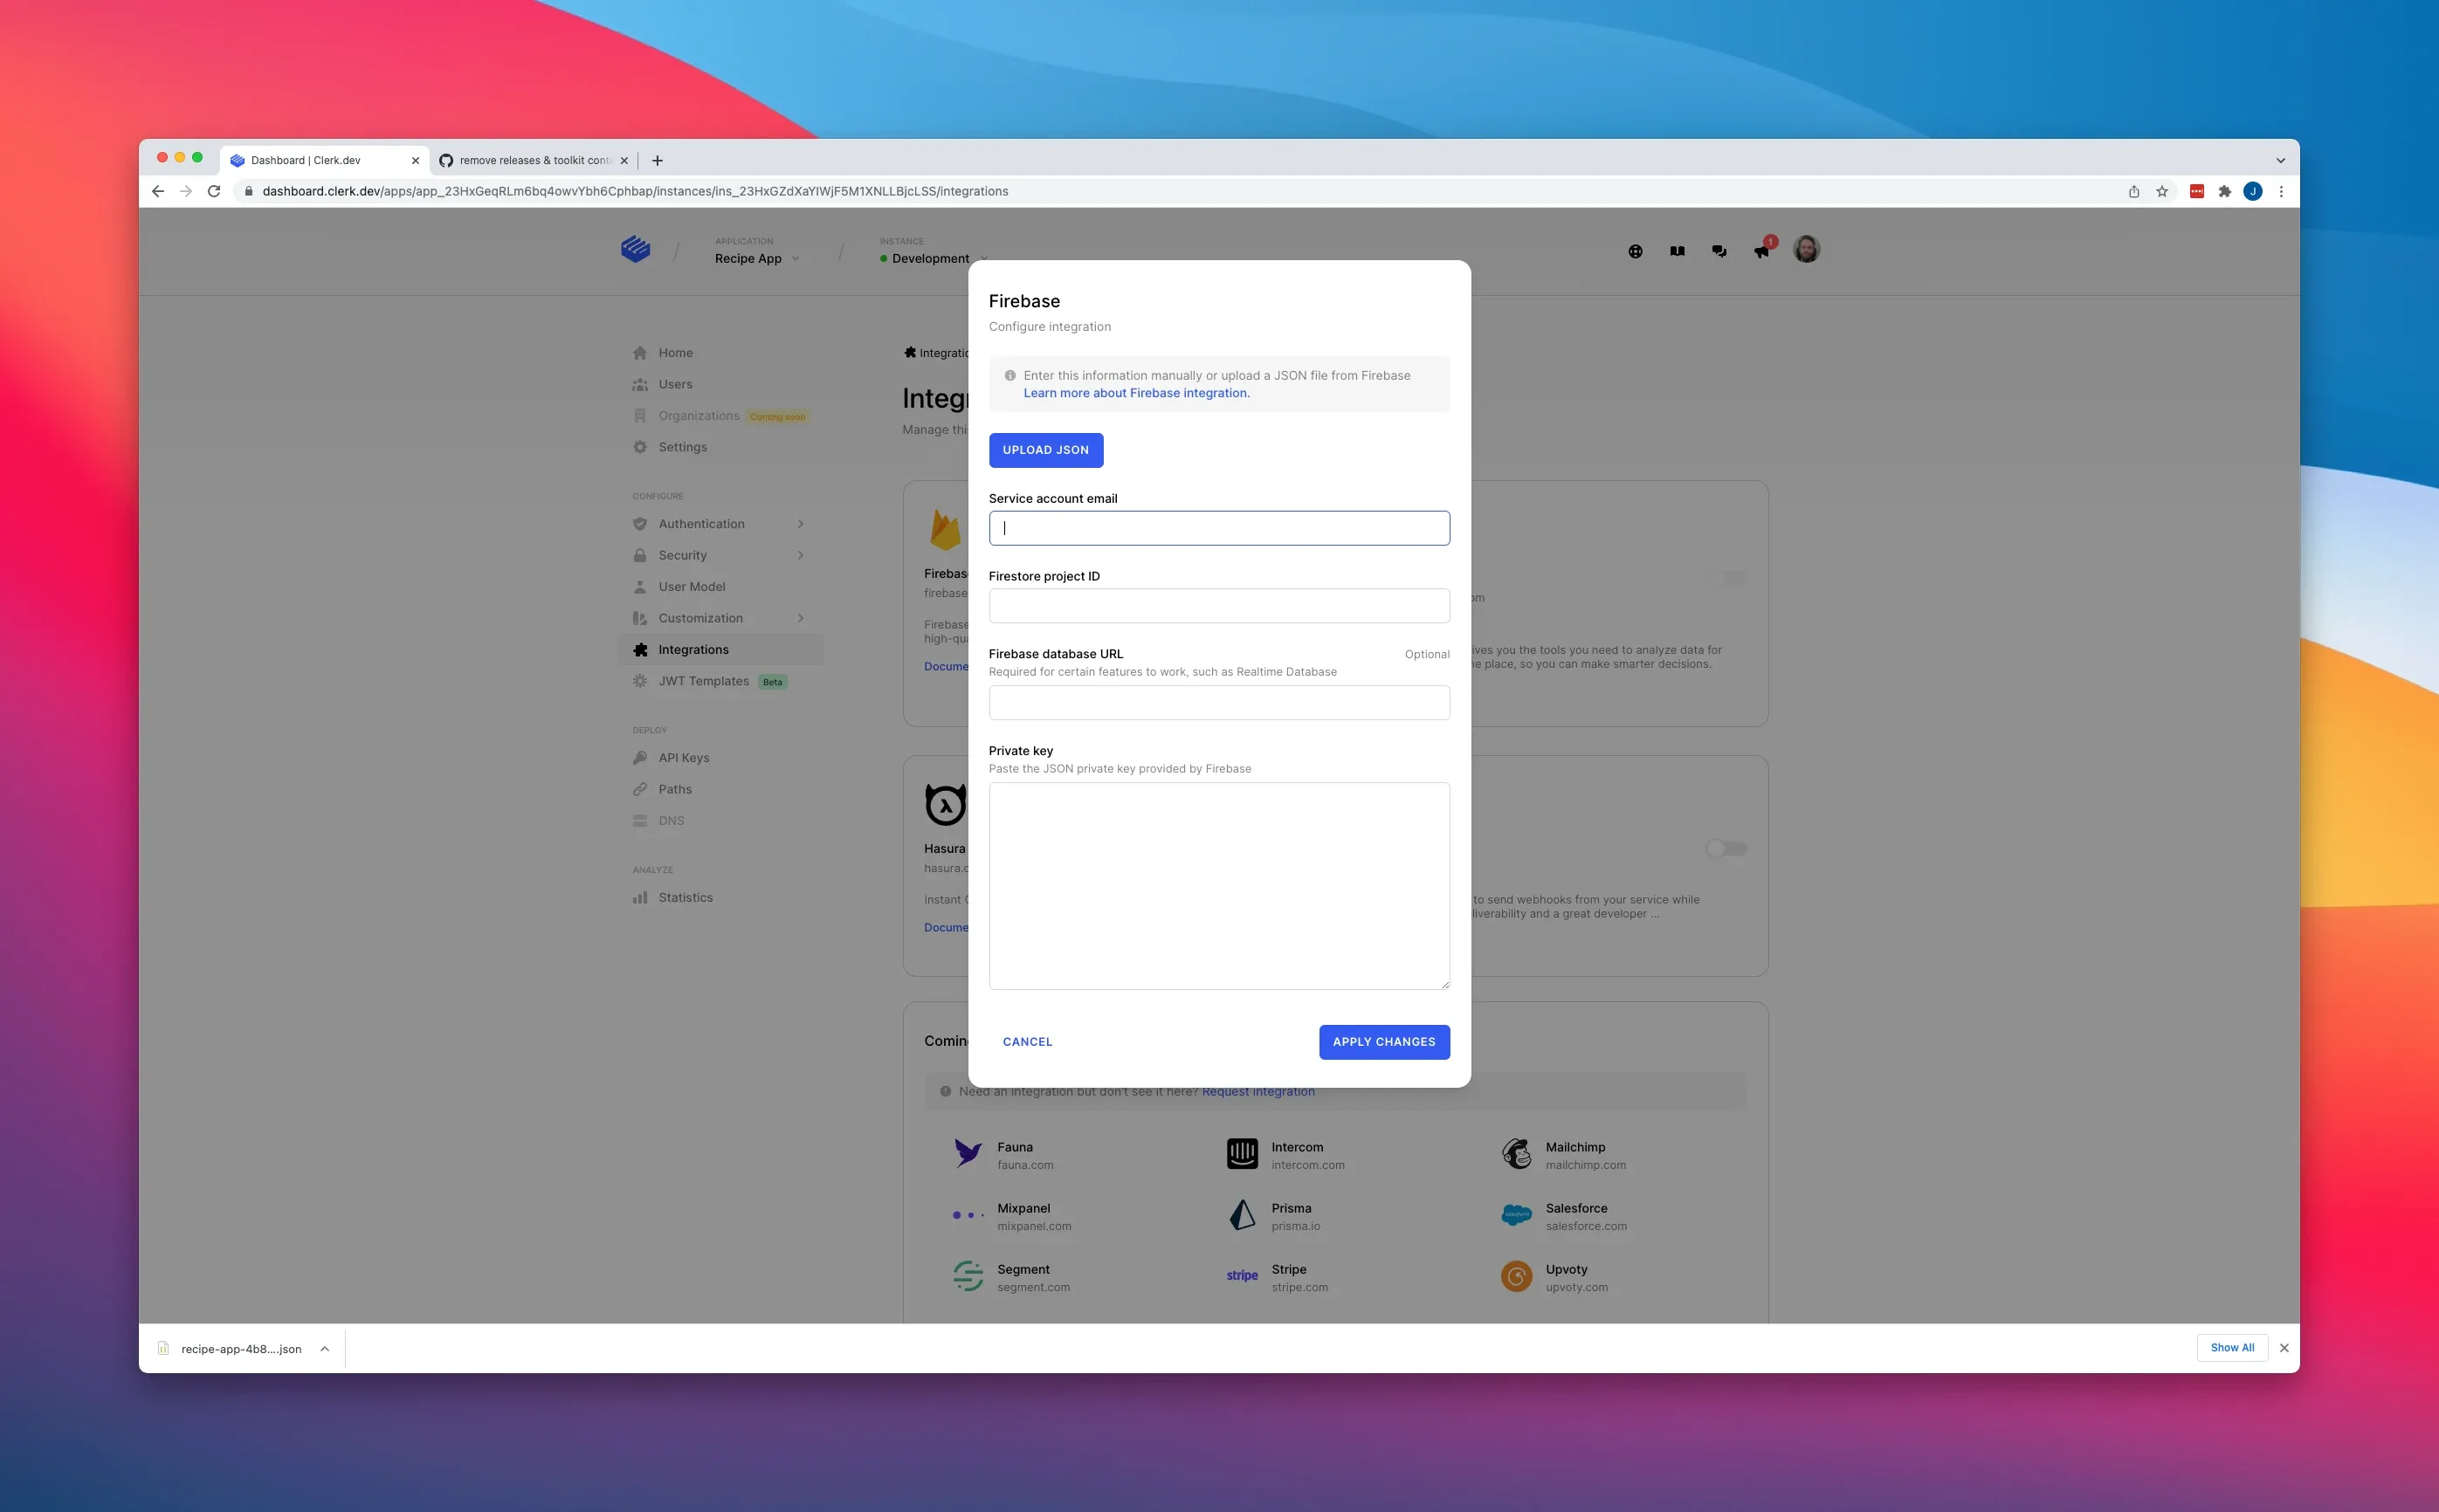
To setup the integration with firebase you will need to select Integrations on the side bar which will drop you into a page with all their offerings. We going to select firebase toggle which will bring up the following Modal:
That JSON you downloaded from firebase can be uploaded here via the Upload JSON button. Once that is down hit Apply changes. We are now setup to get Firebase + Clerk together.
Frontend API
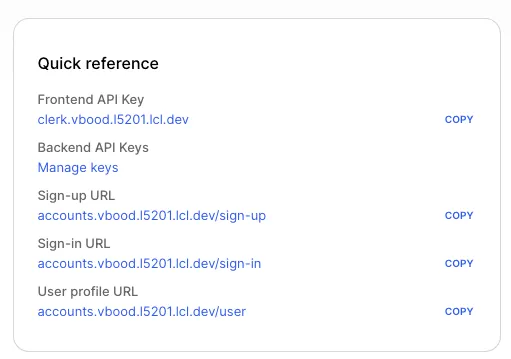
In this post we are using the provided hosted components that makes authentication and user management easy to implement. Select the Home nav on the left hand side and you will see quick reference. Make sure you copy the Frontend API key as we will need this for our Next.js application.
Working with our Next.js application.
We now have all the pieces to start taking our static application that I built and start adding Auth, and firebase to it. Our applications have 4 pages:
- Home page, that shows ALL of the recipes.
- Add Recipe page, to add more recipes.
- Edit recipe page, to edit a recipe.
- A page for every recipe to show how to make our food.
The Code starter can be found here:
Adding all our dependencies
Before we write any more code we do need install two dependancies to make this work.
- Clerk’s Nextjs package.
- Firebase’s package.
yarn add @clerk/nextjs firebaseOnce we are installed we are ready to start coding.
Adding Clerk
Firstly there is a .env.local.example in the starter, make sure you add your Front API described above to the NEXT_PUBLIC_CLERK_FRONTEND_API, and rename this to .env.local .
Now open up the _app.js file found under the pages directory. In the imports section we need to add our ClerkProvider and Clerk components for SignedIn, SignedOut, RedirectToSignIn this will allow us to protect some pages and redirect the user if they aren’t authenticated. We also need Next Router so we can see what pages people are navigating to. So your imports should now look like
import { ChakraProvider } from '@chakra-ui/react';
import { ClerkProvider, SignedIn, SignedOut, RedirectToSignIn } from '@clerk/nextjs';
import { useRouter } from 'next/router';
import { Nav } from '../components/Layout/Nav';
Wrap Our App in ClerkProvider
The ClerkProvider component allows you to wrap up your React / Next application and give you the ability to access things such as sessions and user context. To do that wrap everything in ClerkProvider in the return statement.
import { ChakraProvider } from '@chakra-ui/react';
import { ClerkProvider, SignedIn, SignedOut, RedirectToSignIn } from '@clerk/nextjs';
import { useRouter } from 'next/router';
import { Nav } from '../components/Layout/Nav';

function MyApp({ Component, pageProps }) {
    return (
        <ClerkProvider>
            <ChakraProvider>
                <Nav />
                <Component {...pageProps} />
            </ChakraProvider>
        </ClerkProvider>
    );
}
Protect pages
Now our application is wrapped we can actually tell if the user is signed in or signed out, and Clerk provides built in components to handle this. The first thing we want to do is create an array of all the public pages we want to have. In this recipe app we want two pages, the home page and the recipe page where we can see the full recipe.
const publicPages = ['/',`recipes/[id]`Now we have an array, we can use ternary(conditional) operator to wrap the components in, we will return the page, if it is in our array, or if they are signed in otherwise we will redirect them to sign in. Firstly lets work on the public page part.
We need to use our array with {pathname} which is from next router to create a boolean. We can use includes() for this.
....
const publicPages = ['/', `/recipes/[id]`]

function MyApp({ Component, pageProps }) {
  const {pathname} = useRouter();
	const isPublicPage = publicPages.includes(pathname);
  return (
    <ClerkProvider>
      <ChakraProvider>
					<Nav/>
          <Component {...pageProps} />
      </ChakraProvider>
    </ClerkProvider>
  )
}
Now we can use the decide if it is a public page and allow them to access the page. If you haven’t used a ternary condition before it looks like this:
condition ? ReturnIfTrue : ReturnIfFalse;So we can apply this as:
isPublicPage ? DoSomething : DoSomethingElse;So our _app.js will look like this:
....
const publicPages = ['/', `/recipes/[id]`]

function MyApp({ Component, pageProps }) {
  const {pathname} = useRouter();
	const isPublicPage = publicPages.includes(pathname);
  return (
    <ClerkProvider>
      <ChakraProvider>
					{isPublicPage ? (
          <Component {...pageProps} />
        ) : (
      </ChakraProvider>
    </ClerkProvider>
  )
}
Now that we have the true statement we need a false statement, our false statement is going to do two things, show the user the page if they are indeed logged in, otherwise we will redirect them to our Sign in page.
function MyApp({ Component, pageProps }) {
    const { pathname } = useRouter();
    const isPublicPage = publicPages.includes(pathname);

    return (
        <ClerkProvider>
            <ChakraProvider>
                {isPublicPage ? (
                    <>
                        <Nav />
                        <Component {...pageProps} />
                    </>
                ) : (
                    <>
                        <SignedIn>
                            <Nav />
                            <Component {...pageProps} />
                        </SignedIn>
                        <SignedOut>
                            <RedirectToSignIn />
                        </SignedOut>
                    </>
                )}
            </ChakraProvider>
        </ClerkProvider>
    );
}
Our _app.js is now complete, our false statement, uses the Clerk provided SignedIn component that will check to see if there is a user session that is active. If there is not an active session they cannot access what ever is wrapped inside, in this case any page that is not public.
The SignedOut component does the same thing except it checks if there is NOT a valid user session and renders what is inside, in the case <RedirectToSignIn/> which does exactly what you’d expect.
Adding Firebase
The Firebase package makes communicating with all parts of the firebase such as our Firestore database we created and a way to authenticate our users through Clerk.
Creating our firebase file.
In our root of our project, we will need to create a firebase.js file, this file is going to initialize our firebase connection and also our firebase database connection. The good news, is Google is nice enough to give us the code. If you log into your dashboard and go back to project settings, under General you will see the code.
Below is the one from my example app, the firebaseConfig will look different for you but add this to your firebase.js
import { initializeApp } from 'firebase/app';
// Your web app's Firebase configuration
const firebaseConfig = {
    apiKey: 'AIzaSyBuiWIa1Aw7saTXtxh2ZmieR5kuYDTlW4U',
    authDomain: 'recipe-app-4b8f8.firebaseapp.com',
    databaseURL: 'https://recipe-app-4b8f8-default-rtdb.firebaseio.com',
    projectId: 'recipe-app-4b8f8',
    storageBucket: 'recipe-app-4b8f8.appspot.com',
    messagingSenderId: '336569099381',
    appId: '1:336569099381:web:25f39889adf81ed0ebc43c'
};

const app = initializeApp(firebaseConfig);
Adding our Database connection to our firebase file.
We also need to add our database connection, this will allow us to use it anywhere in the app. To do that we can import firestore using import { getFirestore } from 'firebase/firestore/lite' we are using the lite version because tree shaking is available to keep our bundle size down.
To initialize our database we will pass in our app so firebase knows what database to connect to, so underneath our const app we need to add:
const database = getFirestore(app);

export { database };
This export means we can access the database anywhere in our application. Our full file should look like:
import { initializeApp } from 'firebase/app';
import { getFirestore } from 'firebase/firestore/lite';
// Your web app's Firebase configuration
const firebaseConfig = {
    apiKey: 'AIzaSyBuiWIa1Aw7saTXtxh2ZmieR5kuYDTlW4U',
    authDomain: 'recipe-app-4b8f8.firebaseapp.com',
    databaseURL: 'https://recipe-app-4b8f8-default-rtdb.firebaseio.com',
    projectId: 'recipe-app-4b8f8',
    storageBucket: 'recipe-app-4b8f8.appspot.com',
    messagingSenderId: '336569099381',
    appId: '1:336569099381:web:25f39889adf81ed0ebc43c'
};

const app = initializeApp(firebaseConfig);
const database = getFirestore(app);

export { database };
You can now test what we have so far, by running yarn run dev try navigating to the home page and then to [localhost:3000/addrecipe](http://localhost:3000/addrecipe) the second one should force you to login before you can see it…
Retrieving data from our Database.
Now that we have our authentication, firebase app and firestore setup, we can now start working on getting data from the firebase instead of the hardcoded values. We can start by working on our index.js it is of course the first page you land on.
The first thing we need to do is remove that hardcode JSON, open up the index.js and remove all the objects found inside the recipe state const [recipes, setRecipes] = useState it should now look like
export default function Home() {
  const [recipes, setRecipes] = useState([])
....
Now we have a blank slate to work with, we need to import a few things from firebase and also useEffect from react. The imports we need are collection and getDoc and we also want to import our created database variable we exported. Your imports should look like the following:
import { Box, SimpleGrid, Flex } from '@chakra-ui/react';
import Head from 'next/head';
import Image from 'next/image';
import { RecipeCard } from '../components/RecipeCard';
import { useEffect, useState } from 'react';
import { collection, getDocs } from 'firebase/firestore/lite';
import { database } from '../firebase';
Now we are ready to use useEffect , if you haven’t used useEffect before. It allows you to handle side effects functions. What is a side effect function? An example would be fetching data or directly updating the DOM. We of course are going to be fetching data.
Our useEffect hook is going to contain an async function named getRecipes() and our getRecipes() is going to request this data from firebase. Here is the shell of our useEffect and getRecipes() functions.
useEffect(() => {
    async function getRecipes() {}
    getRecipes();
}, []);
To retrieve data from firebase first we need establish what collection we want to retrieve it from, we can use our imported collection to do this. The sytanx is collection(’yourdatabase’, ‘collectionname) so for us it will be const recipeCollection = collection(database, 'recipes') your function should now look lilke:
useEffect(() => {
    async function getRecipes() {
        const recipeCollection = collection(database, 'recipes');
    }
    getRecipes();
}, []);
Now we have a variable holding our collection we can use that to get all the documents from the database. We are going to use the getDocs import at the top to create an async request and pass in our collection, const recipeSnapshot = await getDocs(recipeCollection) this will give us all of the documents and the data contained within. Your function should now look like:
useEffect(() => {
    async function getRecipes() {
        const recipeCollection = collection(database, 'recipes');
        const recipeSnapshot = await getDocs(recipeCollection);
    }
    getRecipes();
}, []);
The last part of the getRecipes function is to map over the recipe and add in the id as we are going to need this to be able to see our full recipe.
const recipes = recipeSnapshot.docs.map((doc) => {
    const data = doc.data();
    data.id = doc.id;
    return data;
});
We can now use our useState and setRecipe to recipes at that point, before we test here is what the useEffect should look like.
useEffect(() => {
    async function getRecipes() {
        const recipeCollection = collection(database, 'recipes');
        const recipeSnapshot = await getDocs(recipeCollection);
        const recipes = recipeSnapshot.docs.map((doc) => {
            const data = doc.data();
            data.id = doc.id;
            return data;
        });
        setRecipes(recipes);
    }
    getRecipes();
}, []);
If you launch the application now, you will see that instead of the default hard coded recipes you should have the single one, we inserted in the beginning. Now if you click the recipe title, you will notice that you get a 404 not found. So let us fix that.
Here is the commit https://github.com/perkinsjr/recipe-clerk-app/commit/632c727015efd14a81a4127f3544e402354e7de7
Updating our dynamic paths
Our application has dynamic paths, these are created a build time. We can update these to pull the data from our database and make it work correctly. Navigate to /recipes/[id].js and open the code up. First lets import what we need from firebase, we are going to reuse the code from our useEffect and also getDoc and doc so your import should look like:
import { Flex, Box, Button, chakra, Image, useColorModeValue } from '@chakra-ui/react';
import Link from 'next/link';
import { collection, getDocs, getDoc, doc } from 'firebase/firestore/lite';
import { database } from '../../firebase';
Now we can start working on our dynamic paths, the first thing we want to do is start working on getStaticPaths() which is at the bottom of our code, the good news is. We wrote the code already for our useEffect, so go ahead and remove and copy and past that content in. It should look like this.
export async function getStaticPaths() {
    const recipeCollection = collection(database, 'recipes');
    const recipeSnapshot = await getDocs(recipeCollection);
    const recipes = recipeSnapshot.docs.map((doc) => {
        const data = doc.data();
        data.id = doc.id;
        return data;
    });
    const paths = recipes.map((recipe) => ({
        params: {
            id: recipe.id
        }
    }));
    return {
        paths,
        fallback: false
    };
}
While we are here, we want to update fallback to ‘blocking’ this will allow Next.js to serve new pages that haven’t built yet via Server Side Rendering. Our users will never know but it means seamless content.
We now need to update getStaticProps to retrieve the data from our database versus the static code. Remove all the JSON from our file. Just keep the id = [params.id](http://params.id) so your getStaticProps should now look like:
export async function getStaticProps({ params }) {
    const id = params.id;
    return {
        props: {
            recipe
        }
    };
}
Our getStaticProps only need to retrieve a single document based upon the id that is provided. We are going to use the provided getDoc from firebase. We need to provide the database, collection and the id we want to retrieve as a document reference. It will look like this getDoc(doc(database, collection, id) we want this to be async so we will use await .
export async function getStaticProps({ params }) {
    const id = params.id;
    const recipeSnapshot = await getDoc(doc(database, 'recipes', id));
    return {
        props: {
            recipe
        }
    };
}
Similar to all our other requests to firebase, we need to add our id to our response, we can do that just how we did it before, we will use the variable recipe.
export async function getStaticProps({ params }) {
    const id = params.id;
    const recipeSnapshot = await getDoc(doc(database, 'recipes', id));
    const recipe = recipeSnapshot.data();
    recipe.id = recipeSnapshot.id;
    return {
        props: {
            recipe
        }
    };
}
We need to add some revalidation so if someone does add a recipe Next will start a rebuild, so add revalidate: 10 in your return statement
export async function getStaticProps({ params }) {
    const id = params.id;
    const recipeSnapshot = await getDoc(doc(database, 'recipes', id));
    const recipe = recipeSnapshot.data();
    recipe.id = recipeSnapshot.id;
    return {
        props: {
            recipe
        },
        revalidate: 10
    };
}
This can now be tested by launching your development app and then clicking on the recipe title. If all went well you should be able to see the recipe! Great Job.
Let’s add a recipe
Adding a recipe to our application is essential for our users to add there own recipe, however we don’t want users who aren’t logged in to be able to do this. We already protected the route previously, and we set our rules in firebase. So let us see how Clerk and Firebase can work together.
First let us import all the required pieces to make this work, we need import useUser from Clerk, collection addDoc from firebase/firestore/lite and getAuth and signInwithCustomToken from firebase/auth alongside our database your imports should look like:
import {
    Flex,
    FormControl,
    FormLabel,
    Input,
    Heading,
    Textarea,
    Grid,
    GridItem,
    Button
} from '@chakra-ui/react';
import Link from 'next/link';
import { useState } from 'react';
import { useUser } from '@clerk/nextjs';
import { getAuth, signInWithCustomToken } from 'firebase/auth';
import { collection, getDocs, addDoc } from 'firebase/firestore/lite';
import { database } from '../firebase';
We need to create a handleSubmit function that will take the form submission, use clerk to retrieve a firebase token. Use that firebase token to sign in to firebase, then insert a new document into the database. This may sound complicated, but the good news is both Clerk and Firebase have made this much easier.
Underneath the handleChange function create a new function called handleSubmit that is an async function. You should have something that looks like this:
const handleSubmit = async (e) => {};So we want to be able to access our user session from Clerk, when a user is logged in. So above our useState add const user = useUser() this hook allows you to access user details including our firebasetoken.
Now we have that for access, we can request a firebase token from Clerk inside our handleSubmit. To do that Clerk makes it easy with await user.getToken('firebase') so we can add this to our handleSubmit with the variable name firebaseClerkToken
const handleSubmit = async (e) => {
    const firebaseClerkToken = await user.getToken('firebase');
};
Now we need to initialize firebase auth by making a call to getAuth() so underneath our firebaseToken create a variable named auth const auth = getAuth() . Now we are ready to authenticate our Clerk user with firebase, so they can insert into the database.
Firebase offers a signInWithCustomToken that we can use in conjunction with auth and firebaseClerkToken , we don’t actually want to store this a variable, we just need it to log us in. So we can do await signInWithCustomToken(auth, firebaseClerkToken) your handleSubmit should look like this:
const handleSubmit = async (e) => {
    const firebaseClerkToken = await user.getToken('firebase');
    const auth = getAuth();
    await signInWithCustomToken(auth, firebaseClerkToken);
};
Now we need to insert the data into the database we are going to use addDoc which allows us insert a new document. The syntax for insert is addDoc(collection(database, collection_name), data) so for ours it will be addDoc(collection(database, 'recipes'), recipe) , we can create a variable named result and log it out at the same time. So your code should look like:
const handleSubmit = async (e) => {
    const firebaseClerkToken = await user.getToken('firebase');
    const auth = getAuth();
    await signInWithCustomToken(auth, firebaseClerkToken);

    const result = await await addDoc(collection(database, 'recipes'), recipe);
    console.log(result);
};
The final step is to add this handleSubmit to our onSubmit handler for our form. So replace the console.log in the onSubmit to handleSubmit . It should look like this:
<form
        onSubmit={e => {
          e.preventDefault()
          handleSubmit()
        }}
      >
You can now launch the application and navigate to [https://localhost:3000/addrecipe](https://localhost:3000/addrecipe) and give it a whirl!
Editing a recipe
The final step to our application is allow a user to edit the recipe, we all make mistakes or maybe we want to add more data. What is good about most of the work we have done so far, is it all plays nicely into this. We have all the foundational blocks to build upon, we can split this in to two parts. The first being retrieving the data from the database ready for editing, then the second being updating.
All the work will be done in editrecipe.js found in the pages directory. So first we need to add all of our needed imports. We need to import getDoc, updateDoc, doc from firestore/lite , useUser from clerk, useEffect from react and getAuth, signInWithCustomToken from firebase/auth so your imports should look like:
import {
    Flex,
    FormControl,
    FormLabel,
    Input,
    Heading,
    Textarea,
    Grid,
    GridItem,
    Button
} from '@chakra-ui/react';
import Link from 'next/link';
import { useRouter } from 'next/router';
import { collection, getDocs, getDoc, doc, updateDoc } from 'firebase/firestore/lite';
import { useUser } from '@clerk/nextjs';
import { database } from '../firebase';
import { useState, useEffect } from 'react';
import { getAuth, signInWithCustomToken } from 'firebase/auth';
We can now take code from our recipes/[id] getStaticProps to retrieve a single document and use that in useEffect to retrieve the data on the client side.
useEffect(() => {
    async function fetchData() {
        const recipeSnapshot = await getDoc(doc(database, 'recipes', id));
        const recipe = recipeSnapshot.data();
        recipe.id = recipeSnapshot.id;
        setRecipe(recipe);
    }
    fetchData();
}, [id]);
We Now have a way to retrieve and the data. If you launch the app, click on a recipe, and hit edit it should load in all the data from firebase. We can also borrow code from our addRecipe for authentication so we don’t have to write it from scratch.
Create another function for onSubmit and we are going to re-use all the auth parts.
const handleSubmit = async (e) => {
    const firebaseClerkToken = await user.getToken('firebase');
    const auth = getAuth();
    await signInWithCustomToken(auth, firebaseClerkToken);
};
Now we have that we just need to update a doc, similar to the insert we have to use a doc reference alongside our database and collection. The syntax is updateDoc(doc(database,collection,id),data) so for us it would be updateDoc(doc(database, 'recipes', id), recipe) so lets add that to this handle submit with the variable name result .
const handleSubmit = async (e) => {
    const firebaseClerkToken = await user.getToken('firebase');
    const auth = getAuth();
    await signInWithCustomToken(auth, firebaseClerkToken);

    const result = await updateDoc(doc(database, 'recipes', id), recipe);
};
We aren’t doing any error handling here so we can just re-route the user back to the homepage to see the changes so we can add router.push('/')
const handleSubmit = async (e) => {
    const firebaseClerkToken = await user.getToken('firebase');
    const auth = getAuth();
    await signInWithCustomToken(auth, firebaseClerkToken);

    const result = await updateDoc(doc(database, 'recipes', id), recipe);
    router.push('/');
};
Feel free to test this out, it’s fully complete now. You should be able to successfully edit a recipe and see the reflected.
Here is the final code you can use: https://github.com/perkinsjr/recipe-clerk-app/tree/Clerk-Firebase
I hope you really enjoyed this deep dive into Firebase and Clerk, share with your friends drop a comment and make sure you are subscribed to my YouTube and newsletter.

